SpringBoot启动流程
1 Springboot启动流程
1.1 SpringApplication创建
1.1.1 入口
public SpringApplication(ResourceLoader resourceLoader, Class<?>... primarySources) {
    this.sources = new LinkedHashSet();
    this.bannerMode = Mode.CONSOLE;
    this.logStartupInfo = true;
    this.addCommandLineProperties = true;
    this.headless = true;
    this.registerShutdownHook = true;
    this.additionalProfiles = new HashSet();
    this.isCustomEnvironment = false;
    this.resourceLoader = resourceLoader;
    Assert.notNull(primarySources, "PrimarySources must not be null");
    // 将 Main Class 设置为自己的元素
    this.primarySources = new LinkedHashSet<>(Arrays.asList(primarySources));
    // 检查当先的 app 类型
    this.webApplicationType = WebApplicationType.deduceFromClasspath();
    // 先从 Spring.factories 文件中加载 ApplicationContextInitializer 类信息。
    setInitializers((Collection) getSpringFactoriesInstances(ApplicationContextInitializer.class));
    // 先从 Spring.factories 文件中加载 ApplicationListener 类信息。
    setListeners((Collection) getSpringFactoriesInstances(ApplicationListener.class));
    // 获取 main class 信息,并设置到本地属性中
    this.mainApplicationClass = deduceMainApplicationClass();
}
1.1.2 检查应用类型
在将Main class 设置primarySources 后,调用了 WebApplicationType.deduceFromClasspath() 方法,该方法是为了检查当前的应用类型,并设置给 webApplicationType。
static WebApplicationType deduceFromClasspath() {
        if (ClassUtils.isPresent("org.springframework.web.reactive.DispatcherHandler", (ClassLoader)null) && !ClassUtils.isPresent("org.springframework.web.servlet.DispatcherServlet", (ClassLoader)null) && !ClassUtils.isPresent("org.glassfish.jersey.servlet.ServletContainer", (ClassLoader)null)) {
            return REACTIVE;
        } else {
            String[] var0 = SERVLET_INDICATOR_CLASSES;
            int var1 = var0.length;

            for(int var2 = 0; var2 < var1; ++var2) {
                String className = var0[var2];
                if (!ClassUtils.isPresent(className, (ClassLoader)null)) {
                    return NONE;
                }
            }
        }
    }
这里主要是通过类加载器判断是否存在 REACTIVE相关的类信息,假如有就代表是一个 REACTIVE 的应用,假如不是就检查是否存在Servelt和 ConfigurableWebApplicationContext ,假如都没有,就代表应用为非 WEB 类应用,返回 NONE,默认返回SERVLET类型
1.1.3 设置初始化器 Initializer
我们设置完成应用类型后,就寻找所有的 Initializer 实现类,并设置到SpringApplication 的 Initializers 中。
容器刷新之前调用此类的initialize方法。这个点允许被用户自己扩展。用户可以在整个spring容器还没被初始化之前做一些事情。可以想到的场景可能为,在最开始激活一些配置,或者利用这时候class还没被类加载器加载的时机,进行动态字节码注入等操作。
这里先说一下 getSpringFactoriesInstances 方法,我们知道在我们使用 SpringBoot 程序中,会经常在 META-INF/spring.factories 目录下看到一些EnableAutoConfiguration,来出发 config 类注入到容器中,我们知道一般一个 config 类要想被 SpringBoot 扫描到需要使用 @CompnentScan 来扫描具体的路径,对于 jar 包来说这无疑是非常不方便的,所以 SpringBoot 提供了另外一种方式来实现,就是使用 spring.factories。但是要实现,得先进行加载,过程如下:
private <T> Collection<T> getSpringFactoriesInstances(Class<T> type, Class<?>[] parameterTypes, Object... args) {
    ClassLoader classLoader = getClassLoader();
    // Use names and ensure unique to protect against duplicates
    Set<String> names = new LinkedHashSet<>(SpringFactoriesLoader.loadFactoryNames(type, classLoader));
    List<T> instances = createSpringFactoriesInstances(type, parameterTypes, classLoader, args, names);
    AnnotationAwareOrderComparator.sort(instances);
    return instances;
}
我们先来看一下传入参数,这里需要注意的是 args,这个是初始化对应 type 的时候传入的构造参数,我们先看一下 SpringFactoriesLoader#loadFactoryNames 方法:
public static List<String> loadFactoryNames(Class<?> factoryClass, @Nullable ClassLoader classLoader) {
    String factoryClassName = factoryClass.getName();
    return (List)loadSpringFactories(classLoader).getOrDefault(factoryClassName, Collections.emptyList());
}

private static Map<String, List<String>> loadSpringFactories(@Nullable ClassLoader classLoader) {
    MultiValueMap<String, String> result = (MultiValueMap)cache.get(classLoader);
    if (result != null) {
        return result;
    } else {
        try {
            //加载配置文件
            Enumeration<URL> urls = classLoader != null ? classLoader.getResources("META-INF/spring.factories") : ClassLoader.getSystemResources("META-INF/spring.factories");
            LinkedMultiValueMap result = new LinkedMultiValueMap();

            while(urls.hasMoreElements()) {
                URL url = (URL)urls.nextElement();
                UrlResource resource = new UrlResource(url);
                Properties properties = PropertiesLoaderUtils.loadProperties(resource);
                Iterator var6 = properties.entrySet().iterator();

                while(var6.hasNext()) {
                    Entry<?, ?> entry = (Entry)var6.next();
                    List<String> factoryClassNames = Arrays.asList(StringUtils.commaDelimitedListToStringArray((String)entry.getValue()));
                    result.addAll((String)entry.getKey(), factoryClassNames);
                }
            }

            cache.put(classLoader, result);
            return result;
        } catch (IOException var9) {
            throw new IllegalArgumentException("Unable to load factories from location [META-INF/spring.factories]", var9);
        }
    }
}
首先是会先检查缓存,假如缓存中存在就直接返回,假如没有就调用 classLoader#getResources 方法,传入META-INF/spring.factories,即获取所有 jar 包下的对应文件,并封装成 UrlResource ,然后使用 PropertiesLoaderUtils 将这些信息读取成一个对一对的 properties,我们观察一下 spring.factories 都是按 properties 格式排版的,假如有多个就用逗号隔开,所以这里还需要将逗号的多个类分隔开来,并加到 result 中,由于 result 是一个 LinkedMultiValueMap 类型,支持多个值插入,最后放回缓存中。最终完成加载 META-INF/spring.factories 中的配置。
在获取到所有的 Initializer 后接下来是调用 createSpringFactoriesInstances 方法进行初始化。
private <T> Collection<T> getSpringFactoriesInstances(Class<T> type, Class<?>[] parameterTypes, Object... args) {
    ClassLoader classLoader = Thread.currentThread().getContextClassLoader();
    Set<String> names = new LinkedHashSet(SpringFactoriesLoader.loadFactoryNames(type, classLoader));
    List<T> instances = this.createSpringFactoriesInstances(type, parameterTypes, classLoader, args, names);
    AnnotationAwareOrderComparator.sort(instances);
    return instances;
}
private <T> List<T> createSpringFactoriesInstances(Class<T> type, Class<?>[] parameterTypes, ClassLoader classLoader, Object[] args, Set<String> names) {
    List<T> instances = new ArrayList(names.size());
    Iterator var7 = names.iterator();
  // 这里包括很多初始化类信息,包括 apollo , shardingShepre 都是在这里初始化。
    while(var7.hasNext()) {
        String name = (String)var7.next();

        try {
            Class<?> instanceClass = ClassUtils.forName(name, classLoader);
            Assert.isAssignable(type, instanceClass);
            Constructor<?> constructor = instanceClass.getDeclaredConstructor(parameterTypes);
            T instance = BeanUtils.instantiateClass(constructor, args);
            instances.add(instance);
        } catch (Throwable var12) {
            throw new IllegalArgumentException("Cannot instantiate " + type + " : " + name, var12);
        }
    }
    return instances;
}
这里的 names 就是我们上面通过类加载器加载到的类名,到这里会先通过反射生成 class 对象,然后判断该类是否继承与 ApplicationContextInitializer ,最后通过反射的方式获取这个类的构造方法,并调用该构造方法,传入已经定义好的构造参数,对于 ApplicationContextInitializer 是无参的构造方法,然后初始化实例并返回,回到原来的方法,这里会先对所有的 ApplicationContextInitializer 进行排序,调用 AnnotationAwareOrderComparator#sort(instances)方法,这里就是根据 @Order 中的顺序进行排序。
1.1.4 设置监听器
接下来是设置 ApplicationListener,我们跟进去就会发现这里和上面获取 ApplicationContextInitializer 的方法如出一辙。这里不过多介绍。
1.2 SpringApplication run()
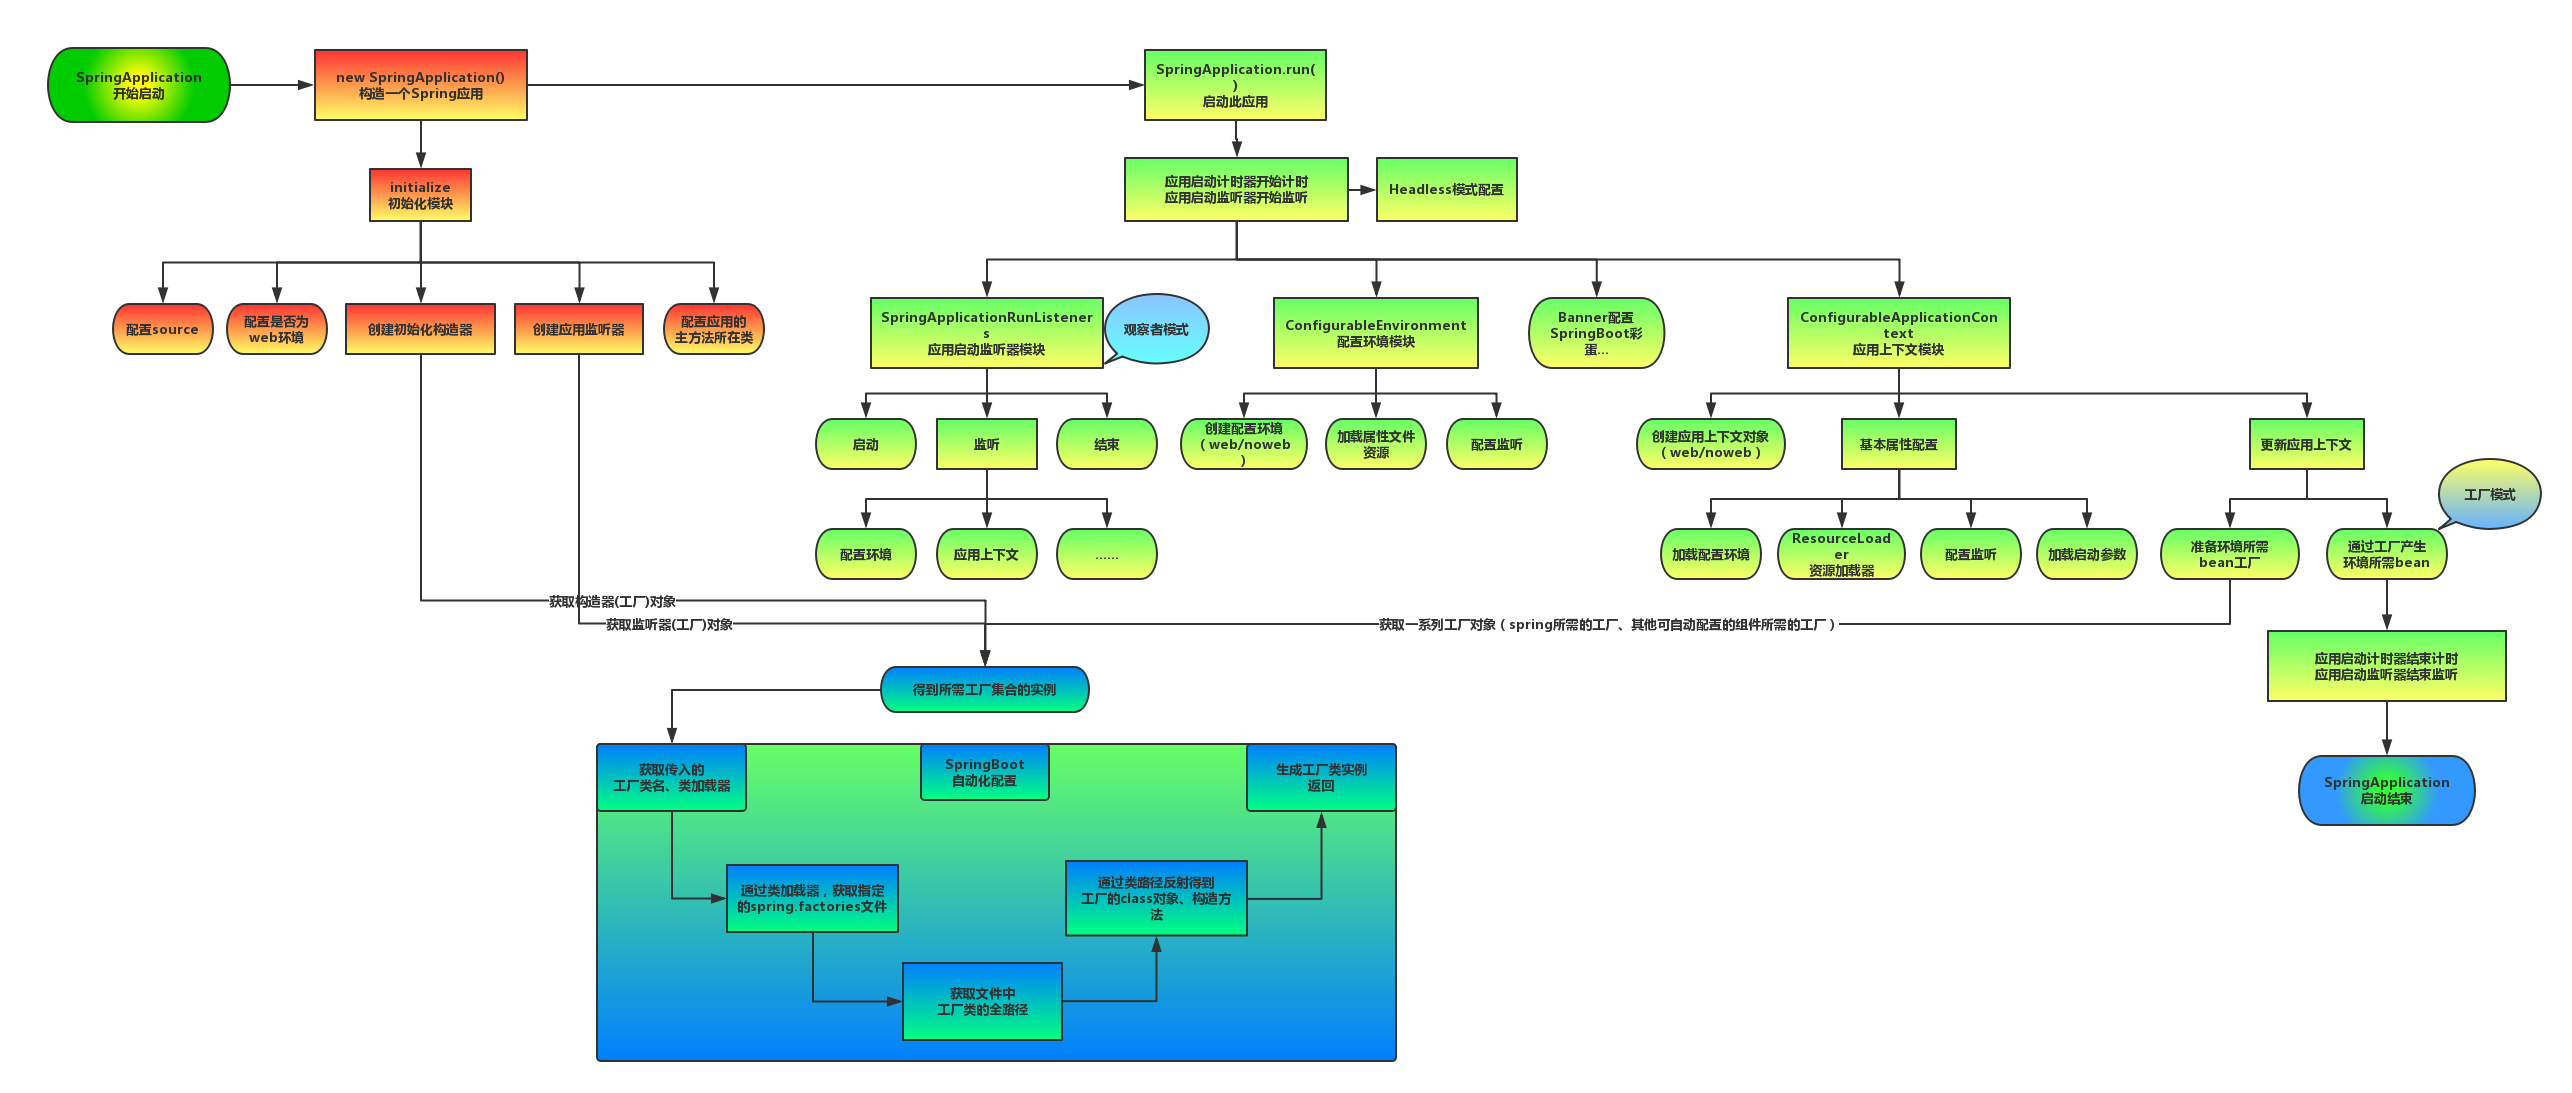
在完成 SpringApplication 对象的初始化后,我们进入了他的 run 方法,这个方法几乎涵盖了 SpringBoot 生命周期的所有内容,主要分为九个步骤。
public ConfigurableApplicationContext run(String... args) {
    // 启动计时器计算初始化完成耗时
    StopWatch stopWatch = new StopWatch();
    stopWatch.start();
    ConfigurableApplicationContext context = null;
    configureHeadlessProperty();
    // 第一步:获取 SpringApplicationRunListener, 然后调用他的 staring 方法启动监听器。
    SpringApplicationRunListeners listeners = getRunListeners(args);
    listeners.starting();
    try {
        ApplicationArguments applicationArguments = new DefaultApplicationArguments(args);
        // 第二步:根据 SpringApplicationRunListeners以及参数来准备环境
        ConfigurableEnvironment environment = prepareEnvironment(listeners, applicationArguments);
        configureIgnoreBeanInfo(environment);
        // 准备打印 Banner
        Banner printedBanner = printBanner(environment);
        // 第三步:创建 Spring 容器
        context = createApplicationContext();
        // 第四步: Spring 容器的前置处理
        prepareContext(context, environment, listeners, applicationArguments, printedBanner);
        // 第五步:刷新 Spring 容器
        refreshContext(context);
        // 第六步: Spring 容器的后置处理器
        afterRefresh(context, applicationArguments);
        // 停止计时
        stopWatch.stop();
        if (this.logStartupInfo) {
            new StartupInfoLogger(this.mainApplicationClass).logStarted(getApplicationLog(), stopWatch);
        }
        //第七步:通知所有 listener 结束启动
        listeners.started(context);
        //第八步:调用所有 runner 的 run 方法
        callRunners(context, applicationArguments);
    }
    catch (Throwable ex) {
        handleRunFailure(context, ex, listeners);
        throw new IllegalStateException(ex);
    }
    //第九步:通知所有 listener running 事件
    try {
        listeners.running(context);
    }
    catch (Throwable ex) {
        handleRunFailure(context, ex, null);
        throw new IllegalStateException(ex);
    }
    return context;
}
1.2.1 获取 SpringApplicationRunListener
private SpringApplicationRunListeners getRunListeners(String[] args) {
    Class<?>[] types = new Class[]{SpringApplication.class, String[].class};
    return new SpringApplicationRunListeners(logger, this.getSpringFactoriesInstances(SpringApplicationRunListener.class, types, this, args));
}
这里和上面获取 initializer 和 listener 的方式基本一致,都是通过 getSpringFactoriesInstances, 最终只找到一个类就是:org.springframework.boot.context.event.EventPublishingRunListener ,然后调用其构造方法并传入产生 args , 和 SpringApplication 本身:
public class EventPublishingRunListener implements SpringApplicationRunListener, Ordered {

   private final SpringApplication application;

   private final String[] args;

   private final SimpleApplicationEventMulticaster initialMulticaster;

   public EventPublishingRunListener(SpringApplication application, String[] args) {
       this.application = application;
       this.args = args;
       this.initialMulticaster = new SimpleApplicationEventMulticaster();
       for (ApplicationListener<?> listener : application.getListeners()) {
           this.initialMulticaster.addApplicationListener(listener);
       }
   }
}
我们先看一下构造函数,首先将我们获取到的ApplicationListener 集合添加到initialMulticaster中, 最后都是通过操作SimpleApplicationEventMulticaster 来进行广播,我,他继承于 AbstractApplicationEventMulticaster。
1.2.2 环境准备
private ConfigurableEnvironment prepareEnvironment(SpringApplicationRunListeners listeners,
        ApplicationArguments applicationArguments) {
    // 根据类型创建对应的 environment
    ConfigurableEnvironment environment = getOrCreateEnvironment();
    // 配置 environment 信息
    configureEnvironment(environment, applicationArguments.getSourceArgs());
    ConfigurationPropertySources.attach(environment);
    // 发送 prepareEnviroment 事件
    listeners.environmentPrepared(environment);
    bindToSpringApplication(environment);
    if (!this.isCustomEnvironment) {
        environment = new EnvironmentConverter(getClassLoader()).convertEnvironmentIfNecessary(environment,
                deduceEnvironmentClass());
    }
    ConfigurationPropertySources.attach(environment);
    return environment;
}
首先是调用 getOrCreateEnvironment方法来创建environment,我们跟进去可以发现这里是根据我们上面设置的环境的类型来进行选择的。
private ConfigurableEnvironment getOrCreateEnvironment() {
    if (this.environment != null) {
        return this.environment;
    } else {
        switch(this.webApplicationType) {
        case SERVLET:
            return new StandardServletEnvironment();
        case REACTIVE:
            return new StandardReactiveWebEnvironment();
        default:
            return new StandardEnvironment();
        }
    }
}
在创建完成 Environment 后,接下来就到了调用 configureEnvironment 方法:
protected void configureEnvironment(ConfigurableEnvironment environment, String[] args) {
    if (this.addConversionService) {
        ConversionService conversionService = ApplicationConversionService.getSharedInstance();
        environment.setConversionService((ConfigurableConversionService) conversionService);
    }
    // 配置PropertySources
    configurePropertySources(environment, args);
    // 配置Profiles
    configureProfiles(environment, args);
}
我们先看一下 configurePropertySources 方法,这里主要分两部分,首先是查询当前是否存在 defaultProperties ,假如不为空就会添加到 environment的propertySources中,接着是处理命令行参数,将命令行参数作为一个CompositePropertySource或者SimpleCommandLinePropertySource添加到 environment的propertySources里面,
protected void configurePropertySources(ConfigurableEnvironment environment, String[] args) {
    MutablePropertySources sources = environment.getPropertySources();
    if (this.defaultProperties != null && !this.defaultProperties.isEmpty()) {
        sources.addLast(new MapPropertySource("defaultProperties", this.defaultProperties));
    }
    if (this.addCommandLineProperties && args.length > 0) {
        String name = "commandLineArgs";
        if (sources.contains(name)) {
            PropertySource<?> source = sources.get(name);
            CompositePropertySource composite = new CompositePropertySource(name);
            composite.addPropertySource(new SimpleCommandLinePropertySource("springApplicationCommandLineArgs", args));
            composite.addPropertySource(source);
            sources.replace(name, composite);
        } else {
            sources.addFirst(new SimpleCommandLinePropertySource(args));
        }
    }
}
接着调用 ConfigurationPropertySources#attach方法,他会先去 environment 中查找 configurationProperties , 假如寻找到了,先检查 configurationProperties 和当前 environment 是否匹配,假如不相等,就先去除,最后添加 configurationProperties 并将其 sources 属性设置进去。
public static void attach(Environment environment) {
    Assert.isInstanceOf(ConfigurableEnvironment.class, environment);
    MutablePropertySources sources = ((ConfigurableEnvironment) environment).getPropertySources();
    PropertySource<?> attached = sources.get(ATTACHED_PROPERTY_SOURCE_NAME);
    if (attached != null && attached.getSource() != sources) {
        sources.remove(ATTACHED_PROPERTY_SOURCE_NAME);
        attached = null;
    }
    if (attached == null) {
        sources.addFirst(new ConfigurationPropertySourcesPropertySource(ATTACHED_PROPERTY_SOURCE_NAME,
                new SpringConfigurationPropertySources(sources)));
    }
}
下一步是通知观察者,发送ApplicationEnvironmentPreparedEvent事件,调用的是 SpringApplicationRunListeners#environmentPrepared方法。会唤醒ConfigFileApplicationListener监听器执行相应逻辑。最主要的加载方法load中,首先会获取到配置文件的搜索路径。如果设置了spring.config.location则会去指定目录下搜索,否则就去默认的搜索目录下classpath:/,classpath:/config/,file:./,file:./config/。
拿到所有待搜索目录后,遍历每个目录获取需要加载的配置文件。如果指定了spring.config.name,则加载指定名称的配置文件。否则使用默认的application作为配置文件的前缀名。然后,会利用PropertiesPropertySourceLoader和YamlPropertySourceLoader加载后缀名为properties、xml、yml或者yaml的文件。
拿到文件目录和文件名后,就可以去对应的路径下加载配置文件了。核心的过程是利用输入流读取配置文件,并根据读到的分隔符进行判断来切分配置文件的key和value。并将内容以key-value键值对的形式封装成一个OriginTrackedMapPropertySource,最后再将一个个配置文件封装成Document。最后遍历这些Documents,调用consumer.accept(profile, document));供上层调用访问。
由于监听器的真正执行是通过调用listener.onApplicationEvent(event)方法来执行的,因此我们从该方法开始分析:
public void onApplicationEvent(ApplicationEvent event) {
    if (event instanceof ApplicationEnvironmentPreparedEvent) {
        this.onApplicationEnvironmentPreparedEvent((ApplicationEnvironmentPreparedEvent)event);
    }

    if (event instanceof ApplicationPreparedEvent) {
        this.onApplicationPreparedEvent(event);
    }

}

private void onApplicationEnvironmentPreparedEvent(ApplicationEnvironmentPreparedEvent event) {
    List<EnvironmentPostProcessor> postProcessors = this.loadPostProcessors();
    postProcessors.add(this);
    AnnotationAwareOrderComparator.sort(postProcessors);
    Iterator var3 = postProcessors.iterator();

    while(var3.hasNext()) {
        EnvironmentPostProcessor postProcessor = (EnvironmentPostProcessor)var3.next();
        postProcessor.postProcessEnvironment(event.getEnvironment(), event.getSpringApplication());
    }

}
这里loadPostProcessors方法就是从spring.factories中加载EnvironmentPostProcessor接口对应的实现类,并把当前对象也添加进去(因为ConfigFileApplicationListener也实现了EnvironmentPostProcessor接口,所以可以添加)。因此在下方遍历时,会访问该类下的postProcessEnvironment方法,从该方法中进入:
public void load() {
    this.profiles = new LinkedList();
    this.processedProfiles = new LinkedList();
    this.activatedProfiles = false;
    this.loaded = new LinkedHashMap();
    this.initializeProfiles();

    while(!this.profiles.isEmpty()) {
        ConfigFileApplicationListener.Profile profile = (ConfigFileApplicationListener.Profile)this.profiles.poll();
        if (profile != null && !profile.isDefaultProfile()) {
            this.addProfileToEnvironment(profile.getName());
        }

        this.load(profile, this::getPositiveProfileFilter, this.addToLoaded(MutablePropertySources::addLast, false));
        this.processedProfiles.add(profile);
    }

    this.resetEnvironmentProfiles(this.processedProfiles);
    this.load((ConfigFileApplicationListener.Profile)null, this::getNegativeProfileFilter, this.addToLoaded(MutablePropertySources::addFirst, true));
    this.addLoadedPropertySources();
}
其中 apply 方法主要是加载 defaultProperties ,假如已经存在,就进行替换,而替换的目标 PropertySource 就是 load这里最后的一个 consumer 函数加载出来的,这里列一下主要做的事情:
1、加载系统中设置的所有的 Profile 。
2、遍历所有的 Profile,假如是默认的 Profile, 就将这个 Profile 加到 environment 中。
3、调用load 方法,加载配置,我们深入看一下这个方法:
private void load(ConfigFileApplicationListener.Profile profile, ConfigFileApplicationListener.DocumentFilterFactory filterFactory, ConfigFileApplicationListener.DocumentConsumer consumer) {
        this.getSearchLocations().forEach((location) -> {
            boolean isFolder = location.endsWith("/");
            Set<String> names = isFolder ? this.getSearchNames() : ConfigFileApplicationListener.NO_SEARCH_NAMES;
            names.forEach((name) -> {
                this.load(location, name, profile, filterFactory, consumer);
            });
        });
    }
首先调用了getSearchLocations方法
private Set<String> getSearchLocations() {
    if (this.environment.containsProperty("spring.config.location")) {
        return this.getSearchLocations("spring.config.location");
    } else {
        Set<String> locations = this.getSearchLocations("spring.config.additional-location");
        locations.addAll(this.asResolvedSet(ConfigFileApplicationListener.this.searchLocations, "classpath:/,classpath:/config/,file:./,file:./config/"));
        return locations;
    }
}
该方法用于获取配置文件的路径,如果利用spring.config.location指定了配置文件路径,则根据该路径进行加载。否则则根据默认路径加载,而默认路径就是我们最初提到的那四个路径。接下来,再深入asResolvedSet方法内部分析一下:
private Set<String> asResolvedSet(String value, String fallback) {
        List<String> list = Arrays.asList(StringUtils.trimArrayElements(StringUtils.commaDelimitedListToStringArray(value != null ? this.environment.resolvePlaceholders(value) : fallback)));
        Collections.reverse(list);
        return new LinkedHashSet(list);
    }
这里的value表示ConfigFileApplicationListener初始化时设置的搜索路径,而fallback就是DEFAULT_SEARCH_LOCATIONS默认搜索路径。StringUtils.trimArrayElements(StringUtils.commaDelimitedListToStringArray())方法就是以逗号作为分隔符对"classpath:/,classpath:/config/,file:./,file:./config/"进行切割,并返回一个字符数组。而这里的Collections.reverse(list);之后,就是体现优先级的时候了,先被扫描到的配置文件会优先生效。
这里我们拿到搜索路径之后,load方法里对每个搜索路径进行遍历,首先调用了getSearchNames()方法
private Set<String> getSearchNames() {
    if (this.environment.containsProperty("spring.config.name")) {
        String property = this.environment.getProperty("spring.config.name");
        return this.asResolvedSet(property, (String)null);
    } else {
        return this.asResolvedSet(ConfigFileApplicationListener.this.names, "application");
    }
}
该方法中如果我们通过spring.config.name设置了要检索的配置文件前缀,会按设置进行加载,否则加载默认的配置文件前缀即application。
拿到所有需要加载的配置文件前缀后,则遍历每个需要加载的配置文件,进行搜索加载,加载过程如下:
private void load(String location, String name, ConfigFileApplicationListener.Profile profile, ConfigFileApplicationListener.DocumentFilterFactory filterFactory, ConfigFileApplicationListener.DocumentConsumer consumer) {
     //下面的if分支默认是不走的,除非我们设置spring.config.name为空或者null
    //或者是spring.config.location指定了配置文件的完整路径,也就是入参location的值
    if (!StringUtils.hasText(name)) {
        Iterator var6 = this.propertySourceLoaders.iterator();

        while(var6.hasNext()) {
            PropertySourceLoader loader = (PropertySourceLoader)var6.next();
            //检查配置文件名的后缀是否符合要求,
            //文件名后缀要求是properties、xml、yml或者yaml
            if (this.canLoadFileExtension(loader, location)) {
                this.load(loader, location, profile, filterFactory.getDocumentFilter(profile), consumer);
                return;
            }
        }
    }

    Set<String> processed = new HashSet();
    Iterator var14 = this.propertySourceLoaders.iterator();
    //propertySourceLoaders属性是在Load类的构造方法中设置的,可以加载文件后缀为properties、xml、yml或者yaml的文件
    while(var14.hasNext()) {
        PropertySourceLoader loaderx = (PropertySourceLoader)var14.next();
        String[] var9 = loaderx.getFileExtensions();
        int var10 = var9.length;

        for(int var11 = 0; var11 < var10; ++var11) {
            String fileExtension = var9[var11];
            if (processed.add(fileExtension)) {
                this.loadForFileExtension(loaderx, location + name, "." + fileExtension, profile, filterFactory, consumer);
            }
        }
    }

}
this.propertySourceLoaders既包含了上面提到的两个PropertiesPropertySourceLoader和YamlPropertySourceLoader,PropertiesPropertySourceLoader可以加载文件扩展名为properties和xml的文件,YamlPropertySourceLoader可以加载文件扩展名为yml和yaml的文件。获取到搜索路径、文件名和扩展名后,就可以到对应的路径下去检索配置文件并加载了。
private void loadForFileExtension(PropertySourceLoader loader, String prefix, String fileExtension, ConfigFileApplicationListener.Profile profile, ConfigFileApplicationListener.DocumentFilterFactory filterFactory, ConfigFileApplicationListener.DocumentConsumer consumer) {
    ConfigFileApplicationListener.DocumentFilter defaultFilter = filterFactory.getDocumentFilter((ConfigFileApplicationListener.Profile)null);
    ConfigFileApplicationListener.DocumentFilter profileFilter = filterFactory.getDocumentFilter(profile);
    if (profile != null) {
         //在文件名上加上profile值,之后调用load方法加载配置文件,入参带有过滤器,可以防止重复加载
        String profileSpecificFile = prefix + "-" + profile + fileExtension;
        this.load(loader, profileSpecificFile, profile, defaultFilter, consumer);
        this.load(loader, profileSpecificFile, profile, profileFilter, consumer);
        Iterator var10 = this.processedProfiles.iterator();

        while(var10.hasNext()) {
            ConfigFileApplicationListener.Profile processedProfile = (ConfigFileApplicationListener.Profile)var10.next();
            if (processedProfile != null) {
                String previouslyLoaded = prefix + "-" + processedProfile + fileExtension;
                this.load(loader, previouslyLoaded, profile, profileFilter, consumer);
            }
        }
    }
    //加载不带profile的配置文件
    this.load(loader, prefix + fileExtension, profile, profileFilter, consumer);
}
// 加载配置文件
private void load(PropertySourceLoader loader, String location, Profile profile, DocumentFilter filter,
                DocumentConsumer consumer) {
    try {
               //调用Resource类到指定路径加载配置文件
               // location比如file:./config/application.properties
        Resource resource = this.resourceLoader.getResource(location);
        if (resource == null || !resource.exists()) {
            if (this.logger.isTraceEnabled()) {
                StringBuilder description = getDescription("Skipped missing config ", location, resource,
                        profile);
                this.logger.trace(description);
            }
            return;
        }
        if (!StringUtils.hasText(StringUtils.getFilenameExtension(resource.getFilename()))) {
            if (this.logger.isTraceEnabled()) {
                StringBuilder description = getDescription("Skipped empty config extension ", location,
                        resource, profile);
                this.logger.trace(description);
            }
            return;
        }
        String name = "applicationConfig: [" + location + "]";
               //读取配置文件内容,将其封装到Document类中,解析文件内容主要是找到
        //配置spring.profiles.active和spring.profiles.include的值
        List<Document> documents = loadDocuments(loader, name, resource);
               //如果文件没有配置数据,则跳过
        if (CollectionUtils.isEmpty(documents)) {
            if (this.logger.isTraceEnabled()) {
                StringBuilder description = getDescription("Skipped unloaded config ", location, resource,
                        profile);
                this.logger.trace(description);
            }
            return;
        }
        List<Document> loaded = new ArrayList<>();
               //遍历配置文件,处理里面配置的profile
        for (Document document : documents) {
            if (filter.match(document)) {
                       //将配置文件中配置的spring.profiles.active和
                   //spring.profiles.include的值写入集合profiles中,
                   //上层调用方法会读取profiles集合中的值,并读取对应的配置文件
                   //addActiveProfiles方法只在第一次调用时会起作用,里面有判断
                addActiveProfiles(document.getActiveProfiles());
                addIncludedProfiles(document.getIncludeProfiles());
                loaded.add(document);
            }
        }
        Collections.reverse(loaded);
        if (!loaded.isEmpty()) {
            loaded.forEach((document) -> consumer.accept(profile, document));
            if (this.logger.isDebugEnabled()) {
                StringBuilder description = getDescription("Loaded config file ", location, resource, profile);
                this.logger.debug(description);
            }
        }
    }
    catch (Exception ex) {
        throw new IllegalStateException("Failed to load property source from location '" + location + "'", ex);
    }
}
该方法首先调用this.resourceLoader.getResource(location);用来判断location路径下的文件是否存在,如果存在,会调用loadDocuments方法对配置文件进行加载:
private List<ConfigFileApplicationListener.Document> loadDocuments(PropertySourceLoader loader, String name, Resource resource) throws IOException {
    ConfigFileApplicationListener.DocumentsCacheKey cacheKey = new ConfigFileApplicationListener.DocumentsCacheKey(loader, resource);
    List<ConfigFileApplicationListener.Document> documents = (List)this.loadDocumentsCache.get(cacheKey);
    if (documents == null) {
        List<PropertySource<?>> loaded = loader.load(name, resource);
        documents = this.asDocuments(loaded);
        this.loadDocumentsCache.put(cacheKey, documents);
    }

    return documents;
}
再内部根据不同的PropertySourceLoader调用相应的load方法和loadProperties(resource)方法
public List<PropertySource<?>> load(String name, Resource resource) throws IOException {
    Map<String, ?> properties = this.loadProperties(resource);
    return properties.isEmpty() ? Collections.emptyList() : Collections.singletonList(new OriginTrackedMapPropertySource(name, properties));
}

private Map<String, ?> loadProperties(Resource resource) throws IOException {
    String filename = resource.getFilename();
    return (Map)(filename != null && filename.endsWith(".xml") ? PropertiesLoaderUtils.loadProperties(resource) : (new OriginTrackedPropertiesLoader(resource)).load());
}
由于我们目前的配置文件只有application.properties,也就是文件结尾不是以xml作为扩展名。因此loadProperties方法会进入到new OriginTrackedPropertiesLoader。因此再进入到new OriginTrackedPropertiesLoader(resource).load();。
public Map<String, OriginTrackedValue> load(boolean expandLists) throws IOException {
    OriginTrackedPropertiesLoader.CharacterReader reader = new OriginTrackedPropertiesLoader.CharacterReader(this.resource);
    Throwable var3 = null;

    try {
        Map<String, OriginTrackedValue> result = new LinkedHashMap();
        StringBuilder buffer = new StringBuilder();

        while(reader.read()) {
            String key = this.loadKey(buffer, reader).trim();
            if (expandLists && key.endsWith("[]")) {
                key = key.substring(0, key.length() - 2);
                int var19 = 0;

                while(true) {
                    OriginTrackedValue value = this.loadValue(buffer, reader, true);
                    this.put(result, key + "[" + var19++ + "]", value);
                    if (!reader.isEndOfLine()) {
                        reader.read();
                    }

                    if (reader.isEndOfLine()) {
                        break;
                    }
                }
            } else {
                OriginTrackedValue value = this.loadValue(buffer, reader, false);
                this.put(result, key, value);
            }
        }

        LinkedHashMap var18 = result;
        return var18;
    } catch (Throwable var16) {
        var3 = var16;
        throw var16;
    }
}
CharacterReader(Resource resource) throws IOException {
            this.reader = new LineNumberReader(new InputStreamReader(resource.getInputStream(), StandardCharsets.ISO_8859_1));
        }
private String loadKey(StringBuilder buffer, OriginTrackedPropertiesLoader.CharacterReader reader) throws IOException {
    buffer.setLength(0);
    boolean previousWhitespace = false;

    while(!reader.isEndOfLine()) {
        // 判断读取到的字节是否为'=' 或者为 ':',如果是则直接返回读取都的buffer内容
        if (reader.isPropertyDelimiter()) {
            reader.read();
            return buffer.toString();
        }

        if (!reader.isWhiteSpace() && previousWhitespace) {
            return buffer.toString();
        }

        previousWhitespace = reader.isWhiteSpace();
        buffer.append(reader.getCharacter());
        reader.read();
    }

    return buffer.toString();
}

private OriginTrackedValue loadValue(StringBuilder buffer, OriginTrackedPropertiesLoader.CharacterReader reader, boolean splitLists) throws IOException {
    buffer.setLength(0);

    while(reader.isWhiteSpace() && !reader.isEndOfLine()) {
        reader.read();
    }

    Location location = reader.getLocation();

    while(!reader.isEndOfLine() && (!splitLists || !reader.isListDelimiter())) {
        buffer.append(reader.getCharacter());
        reader.read();
    }

    Origin origin = new TextResourceOrigin(this.resource, location);
    return OriginTrackedValue.of(buffer.toString(), origin);
}
在这个方法里,首先CharacterReader方法将我们的resource也就是配置文件转为了输入流,然后利用reader.read()进行读取,在loadKey方法中我们看到,这里判断读取到的是否为'='或者为':',也就是我们在配置文件中以'='或者':'分割的key-value。因此看到这里,我们可以直观的感受到这里应该是读取配置文件,并切分key和value的地方。
最终,对配置文件读取完成后,会将其以key-value的形式封装到一个Map集合中进行返回,然后封装到OriginTrackedMapPropertySource中作为一个MapPropertySource对象。再层层往上回退发现会最终封装成一个asDocuments(loaded);Document对象。最后回到最上层的load方法中,loadDocuments(loader, name, resource);方法即返回我们加载好的配置文件Document对象集合。并对集合中的每一个配置文件document对象进行遍历,调用loaded.forEach((document) -> consumer.accept(profile, document));
1.2.3 创建 ApplicationContext
首先是检查 Application的类型,然后获取对应的ApplicationContext类,我们这里是获取到了 org.springframework.boot.web.servlet.context.AnnotationConfigServletWebServerApplicationContext接着调用 BeanUtils.instantiateClass(contextClass); 方法进行对象的初始化。
protected ConfigurableApplicationContext createApplicationContext() {
    Class<?> contextClass = this.applicationContextClass;
    if (contextClass == null) {
        try {
            switch(this.webApplicationType) {
            case SERVLET:
                contextClass = Class.forName("org.springframework.boot.web.servlet.context.AnnotationConfigServletWebServerApplicationContext");
                break;
            case REACTIVE:
                contextClass = Class.forName("org.springframework.boot.web.reactive.context.AnnotationConfigReactiveWebServerApplicationContext");
                break;
            default:
                contextClass = Class.forName("org.springframework.context.annotation.AnnotationConfigApplicationContext");
            }
        } catch (ClassNotFoundException var3) {
            throw new IllegalStateException("Unable create a default ApplicationContext, please specify an ApplicationContextClass", var3);
        }
    }

    return (ConfigurableApplicationContext)BeanUtils.instantiateClass(contextClass);
}
终其实是调用了 AnnotationConfigServletWebServerApplicationContext的默认构造方法。我们看一下这个方法做了什么事情。这里只是简单的设置了一个 reader和一个 scanner,作用于 bean 的扫描工作。
接下来是获取 ExceptionReporter,获取 ExceptionReporter 的方式主要还是和之前 Listener 的方式一致,通过 getSpringFactoriesInstances 来获取所有的 SpringBootExceptionReporter。
1.2.4 准备容器
private void prepareContext(ConfigurableApplicationContext context, ConfigurableEnvironment environment,
        SpringApplicationRunListeners listeners, ApplicationArguments applicationArguments, Banner printedBanner) {
    // 为 ApplicationContext 设置 environment
    context.setEnvironment(environment);
    // 执行容器后置处理器
    postProcessApplicationContext(context);
    // 执行容器中的ApplicationContextInitializer
    applyInitializers(context);
        // 发送 ContextPrepareEvent,通知各个监听器。
    listeners.contextPrepared(context);
    if (this.logStartupInfo) {
        // 打印启动新包括 pid 和 用户等。
        logStartupInfo(context.getParent() == null);
        // 打印 Profile 信息
        logStartupProfileInfo(context);
    }
    // Add boot specific singleton beans
    ConfigurableListableBeanFactory beanFactory = context.getBeanFactory();
    // 将启动参数作为 bean 注入到容器中
    beanFactory.registerSingleton("springApplicationArguments", applicationArguments);
    if (printedBanner != null) {
        // 将banner 注入到容器中
        beanFactory.registerSingleton("springBootBanner", printedBanner);
    }
    if (beanFactory instanceof DefaultListableBeanFactory) {
        // 设置不允许定义同名的BeanDefinition,重复注册时抛出异常
        ((DefaultListableBeanFactory) beanFactory)
                .setAllowBeanDefinitionOverriding(this.allowBeanDefinitionOverriding);
    }
    if (this.lazyInitialization) {
        // 如果是懒加载,则添加懒加载后置处理器。
        context.addBeanFactoryPostProcessor(new LazyInitializationBeanFactoryPostProcessor());
    }
    // 获取启动类的参数
    Set<Object> sources = getAllSources();
    Assert.notEmpty(sources, "Sources must not be empty");
    // 加载启动类,并将其注入到容器中
    load(context, sources.toArray(new Object[0]));
    // 发布 ApplicationPreparedEvent 事件
    listeners.contextLoaded(context);
}
postProcessApplicationContext
其主要实现如下:
1、首先是指定beanNameGenerator,默认情况下不会进入这里,在没有自定义 beanNameGenerator的情况下,AnnotatedBeanDefinitionReader和ClassPathBeanDefinitionScanner的默认实现是AnnotationBeanNameGenerator,即看是否有 value 定义值,假如没有就将首字母变成小写做为bean的名称。
2、查看是否存在resourceLoader有的话就添加到 beanFactory 中。
protected void postProcessApplicationContext(ConfigurableApplicationContext context) {
    if (this.beanNameGenerator != null) {
        context.getBeanFactory().registerSingleton("org.springframework.context.annotation.internalConfigurationBeanNameGenerator", this.beanNameGenerator);
    }

    if (this.resourceLoader != null) {
        if (context instanceof GenericApplicationContext) {
            ((GenericApplicationContext)context).setResourceLoader(this.resourceLoader);
        }

        if (context instanceof DefaultResourceLoader) {
            ((DefaultResourceLoader)context).setClassLoader(this.resourceLoader.getClassLoader());
        }
    }
}
执行 initializer
我们上面提到在初始化 SpringApplication 的时候会加载所有的 ApplicationContextInitializer,到这里就使用到了这些 initializer ,调用每个initializer 的 initialize 方法,并将 Context 作为参数传递进去。
protected void applyInitializers(ConfigurableApplicationContext context) {
    Iterator var2 = this.getInitializers().iterator();

    while(var2.hasNext()) {
        ApplicationContextInitializer initializer = (ApplicationContextInitializer)var2.next();
        Class<?> requiredType = GenericTypeResolver.resolveTypeArgument(initializer.getClass(), ApplicationContextInitializer.class);
        Assert.isInstanceOf(requiredType, context, "Unable to call initializer.");
        initializer.initialize(context);
    }
}
1、DelegatingApplicationContextInitializer: 从environment中获取context.initializer.classes属性,默认为 null,可以使用多个使用逗号隔开,然后将调用这些类的 initialize 方法。
2、SharedMetadataReaderFactoryContextInitializer 主要是在 beanFactory 中添加一个CachingMetadataReaderFactoryPostProcessor 会在 refreshContext 中被执行。
3、ContextIdApplicationContextInitializer 将 Spring.application.name 作为 ContextId 设置到容器中。
4、ConfigurationWarningsApplicationContextInitializer 向beanFacotory 中注册一个 ConfigurationWarningsPostProcessor 作用是添加一下检查。默认有一个ComponentScanPackageCheck,作用是检查@ComponentScan扫描的包路径是否合法.
5、ServerPortInfoApplicationContextInitializer 向 ApplicationContext 中注册一个 ApplicationListener 用于监听WebServerInitializedEvent事件,向Environment中添加端口号local.sever.port。
ConditionEvaluationReportLoggingListener 向容器中注册一个 ConditionEvaluationReportListener 主要用于打印日志。
执行 ApplicationPrepareContext 通知
load 加载
protected void load(ApplicationContext context, Object[] sources) {
    // 打印日志
    if (logger.isDebugEnabled()) {
        logger.debug("Loading source " + StringUtils.arrayToCommaDelimitedString(sources));
    }
    // 初始化 BeanDefinitionLoader
    BeanDefinitionLoader loader = createBeanDefinitionLoader(getBeanDefinitionRegistry(context), sources);
    // 假如 BeanDefinition 不为空,就将其设置到 loader 中。
    if (this.beanNameGenerator != null) {
        loader.setBeanNameGenerator(this.beanNameGenerator);
    }
    // 如果 resourceLoader  不为空,就将 resourceLoader 设置到 loader 中
    if (this.resourceLoader != null) {
        loader.setResourceLoader(this.resourceLoader);
    }
    // 如果 environment  不为空,就将 environment 设置到 loader 中
    if (this.environment != null) {
        loader.setEnvironment(this.environment);
    }
    // 调用 loader 的 load 方法
    loader.load();
}
我们先来看一下 createBeanDefinitionLoader 方法:
BeanDefinitionLoader(BeanDefinitionRegistry registry, Object... sources) {
    Assert.notNull(registry, "Registry must not be null");
    Assert.notEmpty(sources, "Sources must not be empty");
    this.sources = sources;
    this.annotatedReader = new AnnotatedBeanDefinitionReader(registry);
    this.xmlReader = new XmlBeanDefinitionReader(registry);
    if (this.isGroovyPresent()) {
        this.groovyReader = new GroovyBeanDefinitionReader(registry);
    }

    this.scanner = new ClassPathBeanDefinitionScanner(registry);
    this.scanner.addExcludeFilter(new BeanDefinitionLoader.ClassExcludeFilter(sources));
}
主要做了两件事情:
1、设置 Reader ,包括 AnnotatedBeanDefinitionReader 和 XmlBeanDefinitionReader 假如是Groovy 环境就生成 GroovyBeanDefinitionReader 。
2、设置 Scanner ,主要是 ClassPathBeanDefinitionScanner ,然后检查 Application 中是否存在 ExcludeFilter ,有的话加入到 scanner 中。
接着看load方法:
public int load() {
    int count = 0;
    Object[] var2 = this.sources;
    int var3 = var2.length;

    for(int var4 = 0; var4 < var3; ++var4) {
        Object source = var2[var4];
        count += this.load(source);
    }

    return count;
}
这里的主要逻辑是遍历所有的 sources,这里的其实就是我们的 Main 类。最终调用了 load(Class<?> source) 方法,最终调用了 annotatedReader#register(source)方法。
1.2.5 刷新容器
private void refreshContext(ConfigurableApplicationContext context) {
    this.refresh(context);
    if (this.registerShutdownHook) {
        try {
            context.registerShutdownHook();
        } catch (AccessControlException var3) {
        }
    }
}
主要做两件事情:
1、假如需要注册关闭钩子的话,向 Context 注册关闭钩子。
2、调用 refresh 方法,刷新容器。
我们直接来看一下 refresh 方法,其最终调用了 AbstractApplicationContext 的 refresh 方法。其主要内容如下:
 public void refresh() throws BeansException, IllegalStateException {
        synchronized(this.startupShutdownMonitor) {
            //1、准备刷新容器。
            this.prepareRefresh();
            ConfigurableListableBeanFactory beanFactory = this.obtainFreshBeanFactory();
            this.prepareBeanFactory(beanFactory);

            try {
                this.postProcessBeanFactory(beanFactory);
                this.invokeBeanFactoryPostProcessors(beanFactory);
                this.registerBeanPostProcessors(beanFactory);
                this.initMessageSource();
                this.initApplicationEventMulticaster();
                this.onRefresh();
                this.registerListeners();
                this.finishBeanFactoryInitialization(beanFactory);
                this.finishRefresh();
            } catch (BeansException var9) {
                if (this.logger.isWarnEnabled()) {
                    this.logger.warn("Exception encountered during context initialization - cancelling refresh attempt: " + var9);
                }

                this.destroyBeans();
                this.cancelRefresh(var9);
                throw var9;
            } finally {
                this.resetCommonCaches();
            }
        }
    }
这个方法主要有如下步骤:
1、准备刷新容器。
2、初始化 BeanFactory。
3、对 BeanFactory 进行各种功能的填充,如对 @Autowrite 和 @Qualify 的支持就是这步加入的。
4、调用 postProcessBeanFactory 的扩展点。
5、激活各种 beanFactory 处理器。
6、注册拦截 bean 创建的 bean处理器,这里仅仅是创建而已,最后 getBean 的时候才会真正的调用。
7、初始化 Context 的 MessageSource,为一些国际化的内容。
8、初始化 ApplicationEventMulticaster 并放到 bean 工厂中。
9、扩展点,为其他的 Context 子类来初始化其 bean。
10、在所有的 bean 中找到 listener bean,并将其注册到广播器中。
11、初始化剩下的单例 (no-lazy-init)
12、完成刷新过程,并发出 ContextRefreshEvent 通知。
13、清除缓存。
1.2.5.1 准备刷新容器
protected void prepareRefresh() {
    this.startupDate = System.currentTimeMillis();
    this.closed.set(false);
    this.active.set(true);
    if (this.logger.isInfoEnabled()) {
        this.logger.info("Refreshing " + this);
    }

    this.initPropertySources();
    this.getEnvironment().validateRequiredProperties();
    this.earlyApplicationEvents = new LinkedHashSet();
}
上面代码比较简单,主要做了如下事情:
1、设置容器启动时间。
2、设置启动状态。
3、调用 initPropertySources 方法,调用到的是 GenericWebApplicationContext 的 initPropertySources 方法,最终调用如下方法:
4、将当前的 ApplicationListeners 放置到 earlyApplicationListeners 中。
public static void initServletPropertySources(MutablePropertySources sources, @Nullable ServletContext servletContext, @Nullable ServletConfig servletConfig) {
    Assert.notNull(sources, "'propertySources' must not be null");
    String name = "servletContextInitParams";
    if (servletContext != null && sources.contains(name) && sources.get(name) instanceof StubPropertySource) {
        sources.replace(name, new ServletContextPropertySource(name, servletContext));
    }

    name = "servletConfigInitParams";
    if (servletConfig != null && sources.contains(name) && sources.get(name) instanceof StubPropertySource) {
        sources.replace(name, new ServletConfigPropertySource(name, servletConfig));
    }

    //1、如果 `servletContext` 不为空,且是 StubPropertySource 的子类,那么将其转为 `ServletContextPropertySource`.
    //2、如果 `servletConfig` 不为空,且是 StubPropertySource 的子类,那么将其转为 `ServletContextPropertySource`.
    //但是这里的  `servletContext`  和  `servletConfig`  都为空,所以不会进入。
}
1.2.5.2 初始化 BeanFactory
protected ConfigurableListableBeanFactory obtainFreshBeanFactory() {
    this.refreshBeanFactory();
    ConfigurableListableBeanFactory beanFactory = this.getBeanFactory();
    if (this.logger.isDebugEnabled()) {
        this.logger.debug("Bean factory for " + this.getDisplayName() + ": " + beanFactory);
    }

    return beanFactory;
}
主要做两件事情, refreshBeanFactory,初始化BeanFactory,最终调用了 GenericApplicationContext#refreshBeanFactory,如下:
protected final void refreshBeanFactory() throws IllegalStateException {
    if (!this.refreshed.compareAndSet(false, true)) {
        throw new IllegalStateException("GenericApplicationContext does not support multiple refresh attempts: just call 'refresh' once");
    } else {
        this.beanFactory.setSerializationId(this.getId());
    }
}
1、设置 refresh 的状态为 TRUE。
2、为 beanFactory 设置setSerializationId ,这个里是 application,其主要由三段式组成 ApplicationName:profile:port。
接下来分析一下 getBeanFactory 方法:
public final ConfigurableListableBeanFactory getBeanFactory() {
    return this.beanFactory;
}
最终还是调用了返回当前 context 的beanFactory,返回一个DefaultListableBeanFactory。
1.2.5.3 prepareBeanFactory
protected void prepareBeanFactory(ConfigurableListableBeanFactory beanFactory) {
    beanFactory.setBeanClassLoader(this.getClassLoader());
    beanFactory.setBeanExpressionResolver(new StandardBeanExpressionResolver(beanFactory.getBeanClassLoader()));
    beanFactory.addPropertyEditorRegistrar(new ResourceEditorRegistrar(this, this.getEnvironment()));
    beanFactory.addBeanPostProcessor(new ApplicationContextAwareProcessor(this));
    beanFactory.ignoreDependencyInterface(EnvironmentAware.class);
    beanFactory.ignoreDependencyInterface(EmbeddedValueResolverAware.class);
    beanFactory.ignoreDependencyInterface(ResourceLoaderAware.class);
    beanFactory.ignoreDependencyInterface(ApplicationEventPublisherAware.class);
    beanFactory.ignoreDependencyInterface(MessageSourceAware.class);
    beanFactory.ignoreDependencyInterface(ApplicationContextAware.class);
    beanFactory.registerResolvableDependency(BeanFactory.class, beanFactory);
    beanFactory.registerResolvableDependency(ResourceLoader.class, this);
    beanFactory.registerResolvableDependency(ApplicationEventPublisher.class, this);
    beanFactory.registerResolvableDependency(ApplicationContext.class, this);
    beanFactory.addBeanPostProcessor(new ApplicationListenerDetector(this));
    if (beanFactory.containsBean("loadTimeWeaver")) {
        beanFactory.addBeanPostProcessor(new LoadTimeWeaverAwareProcessor(beanFactory));
        beanFactory.setTempClassLoader(new ContextTypeMatchClassLoader(beanFactory.getBeanClassLoader()));
    }

    if (!beanFactory.containsLocalBean("environment")) {
        beanFactory.registerSingleton("environment", this.getEnvironment());
    }

    if (!beanFactory.containsLocalBean("systemProperties")) {
        beanFactory.registerSingleton("systemProperties", this.getEnvironment().getSystemProperties());
    }

    if (!beanFactory.containsLocalBean("systemEnvironment")) {
        beanFactory.registerSingleton("systemEnvironment", this.getEnvironment().getSystemEnvironment());
    }
}
1、为 beanFactory 设置类加载器,为当前 context 的类加载器。
2、设置 beanFactory 的 BeanExpressionResolver 为 StandardBeanExpressionResolver。
3、beanFactory增加一个默认的 PropertyEditor,主要用于对 bean 的属性设置进行管理。
4、为 beanFactory 增加一个 BeanPostProcessor 为 ApplicationContextAwareProcessor。
5、将 EnvironmentAware、EmbeddedValueResolverAware、ResourceLoaderAware、ApplicationEventPublisherAware、MessageSourceAware、ApplicationContextAware、添加到忽略自动装配的接口中。,当spring将ApplicationContextAwareProcessor注册后,那么在invokeAwareInterfaces中直接,调用的Aware类已经不是普通的bean了,如ResourceLoaderAware,那么需要在spring做bean的依赖注入时忽略它们。
6、将当前 Context 注册为解析如下依赖的注入对象,包括 BeanFactory、ResourceLoader、ApplicationEventPublisher、ApplicationContext。比如说我们调用 @Autowrite 注入 ApplicationContext 就是注入当前的 Context。
7、注册 BeanPostProcessor , ApplicationListenerDetector 。
8、添加默认的系统环境bean。
1.2.5.4 postProcessBeanFactory
该方法最终调用了子类的 AnnotationConfigServletWebApplicationContext#postProcessBeanFactory ,
protected void postProcessBeanFactory(ConfigurableListableBeanFactory beanFactory) {
    super.postProcessBeanFactory(beanFactory);
    if (this.basePackages != null && this.basePackages.length > 0) {
        this.scanner.scan(this.basePackages);
    }

    if (!this.annotatedClasses.isEmpty()) {
        this.reader.register(ClassUtils.toClassArray(this.annotatedClasses));
    }
}
主要做了三件事情:
1、为 BeanFactory 设置了一个为ServletContextAwareProcessor 类型的 BeanPostProcessor,并设置了忽略接口ServletContextAware.
2、假如basePackage 大于 0 的话,就调用 scanner 的 scan 方法。
3、如果 annotatedClasses 大于 0 的话,就调用 AnnotatedBeanDefinitionReader 的 register 方法。
1.2.5.5 激活各种 bean 处理器
protected void invokeBeanFactoryPostProcessors(ConfigurableListableBeanFactory beanFactory) {
    PostProcessorRegistrationDelegate.invokeBeanFactoryPostProcessors(beanFactory, this.getBeanFactoryPostProcessors());
    if (beanFactory.getTempClassLoader() == null && beanFactory.containsBean("loadTimeWeaver")) {
        beanFactory.addBeanPostProcessor(new LoadTimeWeaverAwareProcessor(beanFactory));
        beanFactory.setTempClassLoader(new ContextTypeMatchClassLoader(beanFactory.getBeanClassLoader()));
    }
}
1、调用PostProcessorRegistrationDelegate#invokeBeanFactoryPostProcessors.
2、如果beanFactory.getTempClassLoader() 等于null并且 beanFactory含有loadTimeWeaver的定义的话,就向beanFactory添加一个LoadTimeWeaverAwareProcessor,然后设置TempClassLoader 为 ContextTypeMatchClassLoader.
其中最重要的就是调用 invokeBeanDefinitionRegistryPostProcessors 方法中,调用了 ConfigurationClassPostProcessor,主要负责加载大部分的 BeanDefinition注册到 registry 中。具体流程如下:
public void postProcessBeanDefinitionRegistry(BeanDefinitionRegistry registry) {
    int registryId = System.identityHashCode(registry);
    if (this.registriesPostProcessed.contains(registryId)) {
        throw new IllegalStateException("postProcessBeanDefinitionRegistry already called on this post-processor against " + registry);
    } else if (this.factoriesPostProcessed.contains(registryId)) {
        throw new IllegalStateException("postProcessBeanFactory already called on this post-processor against " + registry);
    } else {
        this.registriesPostProcessed.add(registryId);
        this.processConfigBeanDefinitions(registry);
    }
}
主要做了两件事情:
1、生成当前 registry 的 id,然后到 registriesPostProcessed和 registriesPostProcessed中查找,是否存在,主要作用是去重。
2、假如没有重复调用 processConfigBeanDefinitions去加载。
我们进入processConfigBeanDefinitions中:
public void processConfigBeanDefinitions(BeanDefinitionRegistry registry) {
    List<BeanDefinitionHolder> configCandidates = new ArrayList<>();
// 获取已经注册的 bean 名称,这里一般是我们的启动 Application 类。
    String[] candidateNames = registry.getBeanDefinitionNames();

    for (String beanName : candidateNames) {
        BeanDefinition beanDef = registry.getBeanDefinition(beanName);
// 假如 beanDefinition 中的 ConfigurationClass 属性为 full 或者 lite 那代表已经解析过了,跳过。
        if (beanDef.getAttribute(ConfigurationClassUtils.CONFIGURATION_CLASS_ATTRIBUTE) != null) {
            if (logger.isDebugEnabled()) {
                logger.debug("Bean definition has already been processed as a configuration class: " + beanDef);
            }
        }
// 判断当前类是否是 config 类,假如是就加入到 configCandidates 中。
        else if (ConfigurationClassUtils.checkConfigurationClassCandidate(beanDef, this.metadataReaderFactory)) {
            configCandidates.add(new BeanDefinitionHolder(beanDef, beanName));
        }
    }
// 假如 configCandidates 为空就返回
    if (configCandidates.isEmpty()) {
        return;
    }
// 对 configCandidates 使用 @Order 注解进行排序
    configCandidates.sort((bd1, bd2) -> {
        int i1 = ConfigurationClassUtils.getOrder(bd1.getBeanDefinition());
        int i2 = ConfigurationClassUtils.getOrder(bd2.getBeanDefinition());
        return Integer.compare(i1, i2);
    });

    // Detect any custom bean name generation strategy supplied through the enclosing application context
    SingletonBeanRegistry sbr = null;
    if (registry instanceof SingletonBeanRegistry) {
        sbr = (SingletonBeanRegistry) registry;
        if (!this.localBeanNameGeneratorSet) {
            BeanNameGenerator generator = (BeanNameGenerator) sbr.getSingleton(
                    AnnotationConfigUtils.CONFIGURATION_BEAN_NAME_GENERATOR);
            if (generator != null) {
// 设置 beanNameGenerator
                this.componentScanBeanNameGenerator = generator;
                this.importBeanNameGenerator = generator;
            }
        }
    }
    if (this.environment == null) {
        this.environment = new StandardEnvironment();
    }
//实例化 ConfigurationClassParser 为后续解析准备。
    ConfigurationClassParser parser = new ConfigurationClassParser(
            this.metadataReaderFactory, this.problemReporter, this.environment,
            this.resourceLoader, this.componentScanBeanNameGenerator, registry);
// 初始话 candidates 和 alreadyParsed 两个集合
    Set<BeanDefinitionHolder> candidates = new LinkedHashSet<>(configCandidates);
    Set<ConfigurationClass> alreadyParsed = new HashSet<>(configCandidates.size());
    do {
// 进行解析
        parser.parse(candidates);
        parser.validate();
// 获取解析到的 ConfigurationClass
        Set<ConfigurationClass> configClasses = new LinkedHashSet<>(parser.getConfigurationClasses());
        configClasses.removeAll(alreadyParsed);
        // Read the model and create bean definitions based on its content
        if (this.reader == null) {
            this.reader = new ConfigurationClassBeanDefinitionReader(
                    registry, this.sourceExtractor, this.resourceLoader, this.environment,
                    this.importBeanNameGenerator, parser.getImportRegistry());
        }
// 加载 ConfigurationClass 的 beanDefinition
        this.reader.loadBeanDefinitions(configClasses);
// 添加到 ConfigurationClass 中。
        alreadyParsed.addAll(configClasses);
        candidates.clear();
        if (registry.getBeanDefinitionCount() > candidateNames.length) {
            String[] newCandidateNames = registry.getBeanDefinitionNames();
            Set<String> oldCandidateNames = new HashSet<>(Arrays.asList(candidateNames));
            Set<String> alreadyParsedClasses = new HashSet<>();
            for (ConfigurationClass configurationClass : alreadyParsed) {
                alreadyParsedClasses.add(configurationClass.getMetadata().getClassName());
            }
            for (String candidateName : newCandidateNames) {
                if (!oldCandidateNames.contains(candidateName)) {
                    BeanDefinition bd = registry.getBeanDefinition(candidateName);
                    if (ConfigurationClassUtils.checkConfigurationClassCandidate(bd, this.metadataReaderFactory) &&
                            !alreadyParsedClasses.contains(bd.getBeanClassName())) {
                        candidates.add(new BeanDefinitionHolder(bd, candidateName));
                    }
                }
            }
            candidateNames = newCandidateNames;
        }
    }
    while (!candidates.isEmpty());
    // Register the ImportRegistry as a bean in order to support ImportAware @Configuration classes
    if (sbr != null && !sbr.containsSingleton(IMPORT_REGISTRY_BEAN_NAME)) {
        sbr.registerSingleton(IMPORT_REGISTRY_BEAN_NAME, parser.getImportRegistry());
    }

    if (this.metadataReaderFactory instanceof CachingMetadataReaderFactory) {
        // Clear cache in externally provided MetadataReaderFactory; this is a no-op
        // for a shared cache since it'll be cleared by the ApplicationContext.
        ((CachingMetadataReaderFactory) this.metadataReaderFactory).clearCache();
    }
}
主要做了如下7件事情:
1、获取已经注册的bean名称进行遍历:
2、对configCandidates 进行 排序,按照@Order 配置的值进行排序。
3、如果BeanDefinitionRegistry 是SingletonBeanRegistry 子类的话,将registry强转为SingletonBeanRegistry。
4、实例化ConfigurationClassParser 为了解析各个配置类.实例化2个set,candidates 用于将之前加入的configCandidates 进行去重,alreadyParsed 用于判断是否处理过。
5、进行解析。
6、如果SingletonBeanRegistry 不包含org.springframework.context.annotation.ConfigurationClassPostProcessor.importRegistry,则注册一个,bean 为 ImportRegistry. 一般都会进行注册的。
7、清除缓存。
我们先来看一下判断该 bean 是否为configClass的方法。
public static boolean checkConfigurationClassCandidate(
        BeanDefinition beanDef, MetadataReaderFactory metadataReaderFactory) {
// 获取类名,假如不存在则返回。
    String className = beanDef.getBeanClassName();
    if (className == null || beanDef.getFactoryMethodName() != null) {
        return false;
    }
// 获取 AnnotationMetadata
    AnnotationMetadata metadata;
    if (beanDef instanceof AnnotatedBeanDefinition &&
            className.equals(((AnnotatedBeanDefinition) beanDef).getMetadata().getClassName())) {
// 检查是否可以是 AnnotatedBeanDefinition ,是就直接从 BeanDefinition 中获取
        metadata = ((AnnotatedBeanDefinition) beanDef).getMetadata();
    }
    else if (beanDef instanceof AbstractBeanDefinition && ((AbstractBeanDefinition) beanDef).hasBeanClass()) {
// 如果BeanDefinition 是 AnnotatedBeanDefinition的实例,并且beanDef 有 beanClass 属性存在没有则实例化StandardAnnotationMetadata
        Class<?> beanClass = ((AbstractBeanDefinition) beanDef).getBeanClass();
        if (BeanFactoryPostProcessor.class.isAssignableFrom(beanClass) ||
                BeanPostProcessor.class.isAssignableFrom(beanClass) ||
                AopInfrastructureBean.class.isAssignableFrom(beanClass) ||
                EventListenerFactory.class.isAssignableFrom(beanClass)) {
            return false;
        }
        metadata = AnnotationMetadata.introspect(beanClass);
    }
    else {
        try {
// 否则 通过MetadataReaderFactory 中的MetadataReader 进行读取
            MetadataReader metadataReader = metadataReaderFactory.getMetadataReader(className);
            metadata = metadataReader.getAnnotationMetadata();
        }
        catch (IOException ex) {
            if (logger.isDebugEnabled()) {
                logger.debug("Could not find class file for introspecting configuration annotations: " +
                        className, ex);
            }
            return false;
        }
    }
// 如果存在Configuration 注解,则为BeanDefinition 设置configurationClass属性为full
    Map<String, Object> config = metadata.getAnnotationAttributes(Configuration.class.getName());
    if (config != null && !Boolean.FALSE.equals(config.get("proxyBeanMethods"))) {
        beanDef.setAttribute(CONFIGURATION_CLASS_ATTRIBUTE, CONFIGURATION_CLASS_FULL);
    }
// 如果AnnotationMetadata 中有Component,ComponentScan,Import,ImportResource 注解中的任意一个,或者存在 被@bean 注解的方法,则返回true
    else if (config != null || isConfigurationCandidate(metadata)) {
        beanDef.setAttribute(CONFIGURATION_CLASS_ATTRIBUTE, CONFIGURATION_CLASS_LITE);
    }
    else {
        return false;
    }
    Integer order = getOrder(metadata);
    if (order != null) {
        beanDef.setAttribute(ORDER_ATTRIBUTE, order);
    }
    return true;
}
接着来看ConfigurationClassParser的parser():
public void parse(Set<BeanDefinitionHolder> configCandidates) {
    for (BeanDefinitionHolder holder : configCandidates) {
        BeanDefinition bd = holder.getBeanDefinition();
        try {
            if (bd instanceof AnnotatedBeanDefinition) {
                parse(((AnnotatedBeanDefinition) bd).getMetadata(), holder.getBeanName());
            }
            else if (bd instanceof AbstractBeanDefinition && ((AbstractBeanDefinition) bd).hasBeanClass()) {
                parse(((AbstractBeanDefinition) bd).getBeanClass(), holder.getBeanName());
            }
            else {
                parse(bd.getBeanClassName(), holder.getBeanName());
            }
        }
        catch (BeanDefinitionStoreException ex) {
            throw ex;
        }
        catch (Throwable ex) {
            throw new BeanDefinitionStoreException(
                    "Failed to parse configuration class [" + bd.getBeanClassName() + "]", ex);
        }
    }
    this.deferredImportSelectorHandler.process();
}
其主要做了两件事情:
1、遍历configCandidates ,进行处理.根据BeanDefinition 的类型 做不同的处理,一般都会调用ConfigurationClassParser#parse 进行解析。
2、处理ImportSelect。
我们先来看一下第一步:
protected void processConfigurationClass(ConfigurationClass configClass, Predicate<String> filter) throws IOException {
    if (this.conditionEvaluator.shouldSkip(configClass.getMetadata(), ConfigurationPhase.PARSE_CONFIGURATION)) {
        return;
    }
    ConfigurationClass existingClass = this.configurationClasses.get(configClass);
    if (existingClass != null) {
        if (configClass.isImported()) {
            if (existingClass.isImported()) {
                existingClass.mergeImportedBy(configClass);
            }
            // Otherwise ignore new imported config class; existing non-imported class overrides it.
            return;
        }
        else {
            // Explicit bean definition found, probably replacing an import.
            // Let's remove the old one and go with the new one.
            this.configurationClasses.remove(configClass);
            this.knownSuperclasses.values().removeIf(configClass::equals);
        }
    }

    // Recursively process the configuration class and its superclass hierarchy.
    SourceClass sourceClass = asSourceClass(configClass, filter);
    do {
        sourceClass = doProcessConfigurationClass(configClass, sourceClass, filter);
    }
    while (sourceClass != null);

    this.configurationClasses.put(configClass, configClass);
}
主要做如下4件事情:
1、调用 shouldSkip 方法来判断该 configClass 是否需要 跳过。
2、处理Imported 的情况。
3、递归调用进行解析。
4、添加到configurationClasses中。
我们先来看一下真正解析的步骤 doProcessConfigurationClass 方法:
protected final SourceClass doProcessConfigurationClass(
        ConfigurationClass configClass, SourceClass sourceClass, Predicate<String> filter)
        throws IOException {

    if (configClass.getMetadata().isAnnotated(Component.class.getName())) {
        // Recursively process any member (nested) classes first
        processMemberClasses(configClass, sourceClass, filter);
    }

    // Process any @PropertySource annotations
    for (AnnotationAttributes propertySource : AnnotationConfigUtils.attributesForRepeatable(
            sourceClass.getMetadata(), PropertySources.class,
            org.springframework.context.annotation.PropertySource.class)) {
        if (this.environment instanceof ConfigurableEnvironment) {
            processPropertySource(propertySource);
        }
        else {
            logger.info("Ignoring @PropertySource annotation on [" + sourceClass.getMetadata().getClassName() +
                    "]. Reason: Environment must implement ConfigurableEnvironment");
        }
    }

    // Process any @ComponentScan annotations
    Set<AnnotationAttributes> componentScans = AnnotationConfigUtils.attributesForRepeatable(
            sourceClass.getMetadata(), ComponentScans.class, ComponentScan.class);
    if (!componentScans.isEmpty() &&
            !this.conditionEvaluator.shouldSkip(sourceClass.getMetadata(), ConfigurationPhase.REGISTER_BEAN)) {
        for (AnnotationAttributes componentScan : componentScans) {
            // The config class is annotated with @ComponentScan -> perform the scan immediately
            Set<BeanDefinitionHolder> scannedBeanDefinitions =
                    this.componentScanParser.parse(componentScan, sourceClass.getMetadata().getClassName());
            // Check the set of scanned definitions for any further config classes and parse recursively if needed
            for (BeanDefinitionHolder holder : scannedBeanDefinitions) {
                BeanDefinition bdCand = holder.getBeanDefinition().getOriginatingBeanDefinition();
                if (bdCand == null) {
                    bdCand = holder.getBeanDefinition();
                }
                if (ConfigurationClassUtils.checkConfigurationClassCandidate(bdCand, this.metadataReaderFactory)) {
                    parse(bdCand.getBeanClassName(), holder.getBeanName());
                }
            }
        }
    }
    // Process any @Import annotations
    processImports(configClass, sourceClass, getImports(sourceClass), filter, true);
    // Process any @ImportResource annotations
    AnnotationAttributes importResource =
            AnnotationConfigUtils.attributesFor(sourceClass.getMetadata(), ImportResource.class);
    if (importResource != null) {
        String[] resources = importResource.getStringArray("locations");
        Class<? extends BeanDefinitionReader> readerClass = importResource.getClass("reader");
        for (String resource : resources) {
            String resolvedResource = this.environment.resolveRequiredPlaceholders(resource);
            configClass.addImportedResource(resolvedResource, readerClass);
        }
    }
    // Process individual @Bean methods
    Set<MethodMetadata> beanMethods = retrieveBeanMethodMetadata(sourceClass);
    for (MethodMetadata methodMetadata : beanMethods) {
        configClass.addBeanMethod(new BeanMethod(methodMetadata, configClass));
    }

    // Process default methods on interfaces
    processInterfaces(configClass, sourceClass);

    // Process superclass, if any
    if (sourceClass.getMetadata().hasSuperClass()) {
        String superclass = sourceClass.getMetadata().getSuperClassName();
        if (superclass != null && !superclass.startsWith("java") &&
                !this.knownSuperclasses.containsKey(superclass)) {
            this.knownSuperclasses.put(superclass, configClass);
            // Superclass found, return its annotation metadata and recurse
            return sourceClass.getSuperClass();
        }
    }
    // No superclass -> processing is complete
    return null;
}
主要做了如下8件事情:
1、如果该类使用 @Component 注解,调用 processMemberClasses 方法,其主要作用是将类放到 importStack 中,并且判断是否有循环依赖度问题。
2、处理@PropertySource.通过遍历该类中的@PropertySource的注解,如果该类中的environment是ConfigurableEnvironment 子类的话,则调用processPropertySource进行处理。
3、处理@ComponentScan,通过遍历该类上的@ComponentScan 注解,并使用 conditionEvaluator.shouldSkip 进行判断是否需要跳过。没有就通过ComponentScanAnnotationParser#parse方法进行扫描:
4、处理@Import 注解
5、处理 @ImportResource 注解,先重 config 类中查找是否存在该注解,假如存在,就获取其 location 属性,然后遍历 location 位置中的 bean,加入到 configClass 中的 ImportedResource。
6、处理 @Bean 的方法,遍历 @Bean 的方法,并放到 configClass 的 BeanMethod 中。
7、遍历 configClass 的所有接口的 @Bean 的方法,并放到 configClass 的 BeanMethod 中。
8、如果存在父类的话,就将父类放到 knownSuperclasses 中,并返回,返回就类似于递归调用。否则返回 null。
我们回到ConfigurationClassPostProcessor的processConfigBeanDefinitions方法中,接下来是调用 ConfigurationClassBeanDefinitionReader#loadBeanDefinitions 方法。
public void loadBeanDefinitions(Set<ConfigurationClass> configurationModel) {
    TrackedConditionEvaluator trackedConditionEvaluator = new TrackedConditionEvaluator();
    for (ConfigurationClass configClass : configurationModel) {
        loadBeanDefinitionsForConfigurationClass(configClass, trackedConditionEvaluator);
    }
}
主要做两件事情:
1、实例化 TrackedConditionEvaluator;
2、遍历configurationModel ,使用loadBeanDefinitionsForConfigurationClass 方法加载 BeanDefinition。
private void loadBeanDefinitionsForConfigurationClass(
        ConfigurationClass configClass, TrackedConditionEvaluator trackedConditionEvaluator) {

    if (trackedConditionEvaluator.shouldSkip(configClass)) {
        String beanName = configClass.getBeanName();
        if (StringUtils.hasLength(beanName) && this.registry.containsBeanDefinition(beanName)) {
            this.registry.removeBeanDefinition(beanName);
        }
        this.importRegistry.removeImportingClass(configClass.getMetadata().getClassName());
        return;
    }

    if (configClass.isImported()) {
        registerBeanDefinitionForImportedConfigurationClass(configClass);
    }
    for (BeanMethod beanMethod : configClass.getBeanMethods()) {
        loadBeanDefinitionsForBeanMethod(beanMethod);
    }

    loadBeanDefinitionsFromImportedResources(configClass.getImportedResources());
    loadBeanDefinitionsFromRegistrars(configClass.getImportBeanDefinitionRegistrars());
}
主要做了如下几件事情:
1、调用 trackedConditionEvaluator 来判断条件注解,是否需要跳过这个 config 类。如果需要,就将这个类从容器中移除,并且从 importRegistry 中移除。
2、如果当前类中存在@Import 注解,调用 registerBeanDefinitionForImportedConfigurationClass 方法进行注册
3、遍历BeanMethods,依次对其调用loadBeanDefinitionsForBeanMethod进行注册。
4、处理 @ImportResource 注解,具体如下:
private void loadBeanDefinitionsFromImportedResources(
        Map<String, Class<? extends BeanDefinitionReader>> importedResources) {
    Map<Class<?>, BeanDefinitionReader> readerInstanceCache = new HashMap<>();
// 遍历所有的 importedResources
    importedResources.forEach((resource, readerClass) -> {
// 如果是 BeanDefinitionReader,就查看是否是 groovy 类,假如不是就使用 XmlBeanDefinitionReader 类
        if (BeanDefinitionReader.class == readerClass) {
            if (StringUtils.endsWithIgnoreCase(resource, ".groovy")) {
                readerClass = GroovyBeanDefinitionReader.class;
            }
            else {
                readerClass = XmlBeanDefinitionReader.class;
            }
        }
// 尝试重 readerInstanceCache 读取 BeanDefinitionReader 假如没有就实例化。
        BeanDefinitionReader reader = readerInstanceCache.get(readerClass);
        if (reader == null) {
            try {
                reader = readerClass.getConstructor(BeanDefinitionRegistry.class).newInstance(this.registry);
                if (reader instanceof AbstractBeanDefinitionReader) {
                    AbstractBeanDefinitionReader abdr = ((AbstractBeanDefinitionReader) reader);
                    abdr.setResourceLoader(this.resourceLoader);
                    abdr.setEnvironment(this.environment);
                }
                readerInstanceCache.put(readerClass, reader);
            }
            catch (Throwable ex) {
                throw new IllegalStateException(
                        "Could not instantiate BeanDefinitionReader class [" + readerClass.getName() + "]");
            }
        }
// 加载 bean
        reader.loadBeanDefinitions(resource);
    });
}
主要做了四件事情:
1、遍历所有的 importedResources 。
2、选择 BeanDefinitionReader,假如是 groovy 类,就使用 GroovyBeanDefinitionReader 不是就使用 XmlBeanDefinitionReader
3、尝试从readerInstanceCache中获取对应的BeanDefinitionReader,如果不存在,则实例化一个,然后放入到readerInstanceCache缓存中。
4、调用 BeanDefinitionReader#loadBeanDefinitions 进行加载 bean。
5、注册@Import注解中的ImportBeanDefinitionRegistrar接口的registerBeanDefinitions。
接下来,我们继续看容器刷新流程
1.2.5.6 registerBeanPostProcessors 方法
这个方法最终调用了 PostProcessorRegistrationDelegate#registerBeanPostProcessors,如下:
public static void registerBeanPostProcessors(
        ConfigurableListableBeanFactory beanFactory, AbstractApplicationContext applicationContext) {

    String[] postProcessorNames = beanFactory.getBeanNamesForType(BeanPostProcessor.class, true, false);

    // Register BeanPostProcessorChecker that logs an info message when
    // a bean is created during BeanPostProcessor instantiation, i.e. when
    // a bean is not eligible for getting processed by all BeanPostProcessors.
    int beanProcessorTargetCount = beanFactory.getBeanPostProcessorCount() + 1 + postProcessorNames.length;
    beanFactory.addBeanPostProcessor(new BeanPostProcessorChecker(beanFactory, beanProcessorTargetCount));

    // Separate between BeanPostProcessors that implement PriorityOrdered,
    // Ordered, and the rest.
    List<BeanPostProcessor> priorityOrderedPostProcessors = new ArrayList<>();
    List<BeanPostProcessor> internalPostProcessors = new ArrayList<>();
    List<String> orderedPostProcessorNames = new ArrayList<>();
    List<String> nonOrderedPostProcessorNames = new ArrayList<>();
    for (String ppName : postProcessorNames) {
        if (beanFactory.isTypeMatch(ppName, PriorityOrdered.class)) {
            BeanPostProcessor pp = beanFactory.getBean(ppName, BeanPostProcessor.class);
            priorityOrderedPostProcessors.add(pp);
            if (pp instanceof MergedBeanDefinitionPostProcessor) {
                internalPostProcessors.add(pp);
            }
        }
        else if (beanFactory.isTypeMatch(ppName, Ordered.class)) {
            orderedPostProcessorNames.add(ppName);
        }
        else {
            nonOrderedPostProcessorNames.add(ppName);
        }
    }

    // First, register the BeanPostProcessors that implement PriorityOrdered.
    sortPostProcessors(priorityOrderedPostProcessors, beanFactory);
    registerBeanPostProcessors(beanFactory, priorityOrderedPostProcessors);

    // Next, register the BeanPostProcessors that implement Ordered.
    List<BeanPostProcessor> orderedPostProcessors = new ArrayList<>(orderedPostProcessorNames.size());
    for (String ppName : orderedPostProcessorNames) {
        BeanPostProcessor pp = beanFactory.getBean(ppName, BeanPostProcessor.class);
        orderedPostProcessors.add(pp);
        if (pp instanceof MergedBeanDefinitionPostProcessor) {
            internalPostProcessors.add(pp);
        }
    }
    sortPostProcessors(orderedPostProcessors, beanFactory);
    registerBeanPostProcessors(beanFactory, orderedPostProcessors);

    // Now, register all regular BeanPostProcessors.
    List<BeanPostProcessor> nonOrderedPostProcessors = new ArrayList<>(nonOrderedPostProcessorNames.size());
    for (String ppName : nonOrderedPostProcessorNames) {
        BeanPostProcessor pp = beanFactory.getBean(ppName, BeanPostProcessor.class);
        nonOrderedPostProcessors.add(pp);
        if (pp instanceof MergedBeanDefinitionPostProcessor) {
            internalPostProcessors.add(pp);
        }
    }
    registerBeanPostProcessors(beanFactory, nonOrderedPostProcessors);

    // Finally, re-register all internal BeanPostProcessors.
    sortPostProcessors(internalPostProcessors, beanFactory);
    registerBeanPostProcessors(beanFactory, internalPostProcessors);

    // Re-register post-processor for detecting inner beans as ApplicationListeners,
    // moving it to the end of the processor chain (for picking up proxies etc).
    beanFactory.addBeanPostProcessor(new ApplicationListenerDetector(applicationContext));
}
1、先从 beanFactory 中获取 BeanPostProcessor 类型的 bean。
2、添加一个BeanPostProcessor , BeanPostProcessorChecker ,主要用于日志打印。
3、遍历所有的 postProcessorNames :
(1)将所有实现了 PriorityOrdered 接口的 bean 放到 priorityOrderedPostProcessors 中。
(2)如果bean 即实现了 PriorityOrdered 接口,也实现了 MergedBeanDefinitionPostProcessor 接口的话,将其放到 internalPostProcessors 中。
(3)假如 bean 实现了 Ordered 接口放到 orderedPostProcessorNames 中。
(4)假如都没有,就放到 nonOrderedPostProcessorNames 中。
4、注册 priorityOrderedPostProcessors 的 BPP
5、注册 orderedPostProcessors 的 BPP
6、注册所有 nonOrderedPostProcessors 的 BPP
7、 注册所有MergedBeanDefinitionPostProcessor类型的BeanPostProcessor,并非是重复注册.如下:
8、在最后新增一个BPP 是 ApplicationListenerDetector。
1.2.5.7 initMessageSource 方法
1、从 beanFactory 中读取 messageSource ,看是否存在,假如存在,获取之,然后判断是是HierarchicalMessageSource 类型假如是,就将其 ParentMessageSource 设置为 nternalParentMessageSource。
2、如果不存在,就实例化 DelegatingMessageSource 作为 getInternalParentMessageSource 调用的结果。
1.2.5.8 初始化 ApplicationEventMulticaster
这里的逻辑主要是 如果存在用户自定义的广播器,那么就将其设置为默认广播器。假如不存在就初始化 SimpleApplicationEventMulticaster 作为默认的广播器。
1.2.5.9 Onrefresh
这个接口是留给子类的扩展点 ServletWebServerApplicationContext 的代码如下:
@Override
protected void onRefresh() {
    super.onRefresh();
    try {
        createWebServer();
    }
    catch (Throwable ex) {
        throw new ApplicationContextException("Unable to start web server", ex);
    }
}
1 、先调用父类的 onRefresh 方法
2、调用完父类的 Onfresh 后,创建一个嵌入的Servlet容器.
public static ThemeSource initThemeSource(ApplicationContext context) {
    if (context.containsLocalBean(THEME_SOURCE_BEAN_NAME)) {
        ThemeSource themeSource = context.getBean(THEME_SOURCE_BEAN_NAME, ThemeSource.class);
        // Make ThemeSource aware of parent ThemeSource.
        if (context.getParent() instanceof ThemeSource && themeSource instanceof HierarchicalThemeSource) {
            HierarchicalThemeSource hts = (HierarchicalThemeSource) themeSource;
            if (hts.getParentThemeSource() == null) {
                // Only set parent context as parent ThemeSource if no parent ThemeSource
                // registered already.
                hts.setParentThemeSource((ThemeSource) context.getParent());
            }
        }
        if (logger.isDebugEnabled()) {
            logger.debug("Using ThemeSource [" + themeSource + "]");
        }
        return themeSource;
    }
    else {
        // Use default ThemeSource to be able to accept getTheme calls, either
        // delegating to parent context's default or to local ResourceBundleThemeSource.
        HierarchicalThemeSource themeSource = null;
        if (context.getParent() instanceof ThemeSource) {
            themeSource = new DelegatingThemeSource();
            themeSource.setParentThemeSource((ThemeSource) context.getParent());
        }
        else {
            themeSource = new ResourceBundleThemeSource();
        }
        if (logger.isDebugEnabled()) {
            logger.debug("Unable to locate ThemeSource with name '" + THEME_SOURCE_BEAN_NAME +
                    "': using default [" + themeSource + "]");
        }
        return themeSource;
    }
}
1、如果context中有themeSource的定义
(1)从context 获取,id 为themeSource type为ThemeSource 的 bean
(2)如果父容器实现了ThemeSource,并且ThemeSource 是HierarchicalThemeSource 的子类,并且HierarchicalThemeSource 的ParentThemeSource 没有进行设置.则将父容器赋值给HierarchicalThemeSource的ParentThemeSource
2、如果context中没有themeSource的定义
(1)如果父容器为ThemeSource的子类,则实例化DelegatingThemeSource,并将父容器赋值给DelegatingThemeSource的ParentThemeSource
(2)否则实例化为DelegatingThemeSource
1.2.5.10 registerListeners 注册监听器
这个方法的主要作用是初始化所有的 listener
protected void registerListeners() {
    // Register statically specified listeners first.
    for (ApplicationListener<?> listener : getApplicationListeners()) {
        getApplicationEventMulticaster().addApplicationListener(listener);
    }

    // Do not initialize FactoryBeans here: We need to leave all regular beans
    // uninitialized to let post-processors apply to them!
    String[] listenerBeanNames = getBeanNamesForType(ApplicationListener.class, true, false);
    for (String listenerBeanName : listenerBeanNames) {
        getApplicationEventMulticaster().addApplicationListenerBean(listenerBeanName);
    }

    // Publish early application events now that we finally have a multicaster...
    Set<ApplicationEvent> earlyEventsToProcess = this.earlyApplicationEvents;
    this.earlyApplicationEvents = null;
    if (!CollectionUtils.isEmpty(earlyEventsToProcess)) {
        for (ApplicationEvent earlyEvent : earlyEventsToProcess) {
            getApplicationEventMulticaster().multicastEvent(earlyEvent);
        }
    }
}
1、硬编码方式注册的监听器添加到SimpleApplicationEventMulticaster中的defaultRetriever的applicationListeners
2、将注册到配置文件中的 ApplicationListener 找出来,并添加到SimpleApplicationEventMulticaster中的defaultRetriever。
3、 将之前发生的 earlyApplicationEvents 重复发送一遍。
1.2.5.11 finishBeanFactoryInitialization
该方法主要作用是 初始化剩余的单例(non-lazy-init))
protected void finishBeanFactoryInitialization(ConfigurableListableBeanFactory beanFactory) {
    // Initialize conversion service for this context.
    if (beanFactory.containsBean(CONVERSION_SERVICE_BEAN_NAME) &&
        beanFactory.isTypeMatch(CONVERSION_SERVICE_BEAN_NAME, ConversionService.class)) {
        beanFactory.setConversionService(
                beanFactory.getBean(CONVERSION_SERVICE_BEAN_NAME, ConversionService.class));
    }

    // Register a default embedded value resolver if no bean post-processor
    // (such as a PropertyPlaceholderConfigurer bean) registered any before:
    // at this point, primarily for resolution in annotation attribute values.
    if (!beanFactory.hasEmbeddedValueResolver()) {
        beanFactory.addEmbeddedValueResolver(strVal -> getEnvironment().resolvePlaceholders(strVal));
    }

    // Initialize LoadTimeWeaverAware beans early to allow for registering their transformers early.
    String[] weaverAwareNames = beanFactory.getBeanNamesForType(LoadTimeWeaverAware.class, false, false);
    for (String weaverAwareName : weaverAwareNames) {
        getBean(weaverAwareName);
    }

    // Stop using the temporary ClassLoader for type matching.
    beanFactory.setTempClassLoader(null);

    // Allow for caching all bean definition metadata, not expecting further changes.
    beanFactory.freezeConfiguration();

    // Instantiate all remaining (non-lazy-init) singletons.
    beanFactory.preInstantiateSingletons();
}
1、如果 beaFactory 中存在 CONVERSION_SERVICE_BEAN_NAME name 的 bean,并且类型为 ConversionService.class ,将其设置到 beanFactory 中。
2、如果 beanFactory 中没有 EmbeddedValueResolver,添加一个。
3、设置 type 为 LoadTimeWeaverAware 的bean。
4、设置TempClassLoader 为null
5、冻结所有 bean 的定义,也就是从这里开始,所有的 bean 后面都不允许被修改了。
6、初始化剩下的单实例.
1.2.5.12 finishRefresh
protected void finishRefresh() {
    // Clear context-level resource caches (such as ASM metadata from scanning).
    clearResourceCaches();

    // Initialize lifecycle processor for this context.
    initLifecycleProcessor();

    // Propagate refresh to lifecycle processor first.
    getLifecycleProcessor().onRefresh();

    // Publish the final event.
    publishEvent(new ContextRefreshedEvent(this));

    // Participate in LiveBeansView MBean, if active.
    LiveBeansView.registerApplicationContext(this);
}
1、清理 resource caches。
2、初始化LifecycleProcessor.
3、调用 LifecycleProcessor 的 onrefresh 方法。
4、发布ContextRefreshedEvent 事件.
1.2.5.13 resetCommonCaches
1、清除 ReflectionUtils 缓存。
2、清除 AnnotationUtils 缓存。
3、清除 ResolvableType 缓存。
1.2.6 afterRefresh Spring 容器的后置处理器
1.2.7 通知所有 listener 结束启动
这里最终调用了 EventPublishingRunListener#started 方法:
public void started(ConfigurableApplicationContext context) {
    context.publishEvent(new ApplicationStartedEvent(this.application, this.args, context));
    AvailabilityChangeEvent.publish(context, LivenessState.CORRECT);
}
1、首先是调用 context.publishEvent 来发布启动完成事件。
2、调用 AvailabilityChangeEvent 发布 CORRECT 事件,代表启动成功。
1.2.8 调用所有 runner 的 run 方法
private void callRunners(ApplicationContext context, ApplicationArguments args) {
    List<Object> runners = new ArrayList<>();
    runners.addAll(context.getBeansOfType(ApplicationRunner.class).values());
    runners.addAll(context.getBeansOfType(CommandLineRunner.class).values());
    AnnotationAwareOrderComparator.sort(runners);
    for (Object runner : new LinkedHashSet<>(runners)) {
        if (runner instanceof ApplicationRunner) {
            callRunner((ApplicationRunner) runner, args);
        }
        if (runner instanceof CommandLineRunner) {
            callRunner((CommandLineRunner) runner, args);
        }
    }
}
首先查找所有的 ApplicationRunner 和 CommandLineRunner ,然后遍历调用他们的 run 方法。
1.2.9 通知所有 listener running 事件。
⚠️大家可以参考这个图,因为没钱买,只能放链接了 springboot启动流程
2 springboot 扩展点
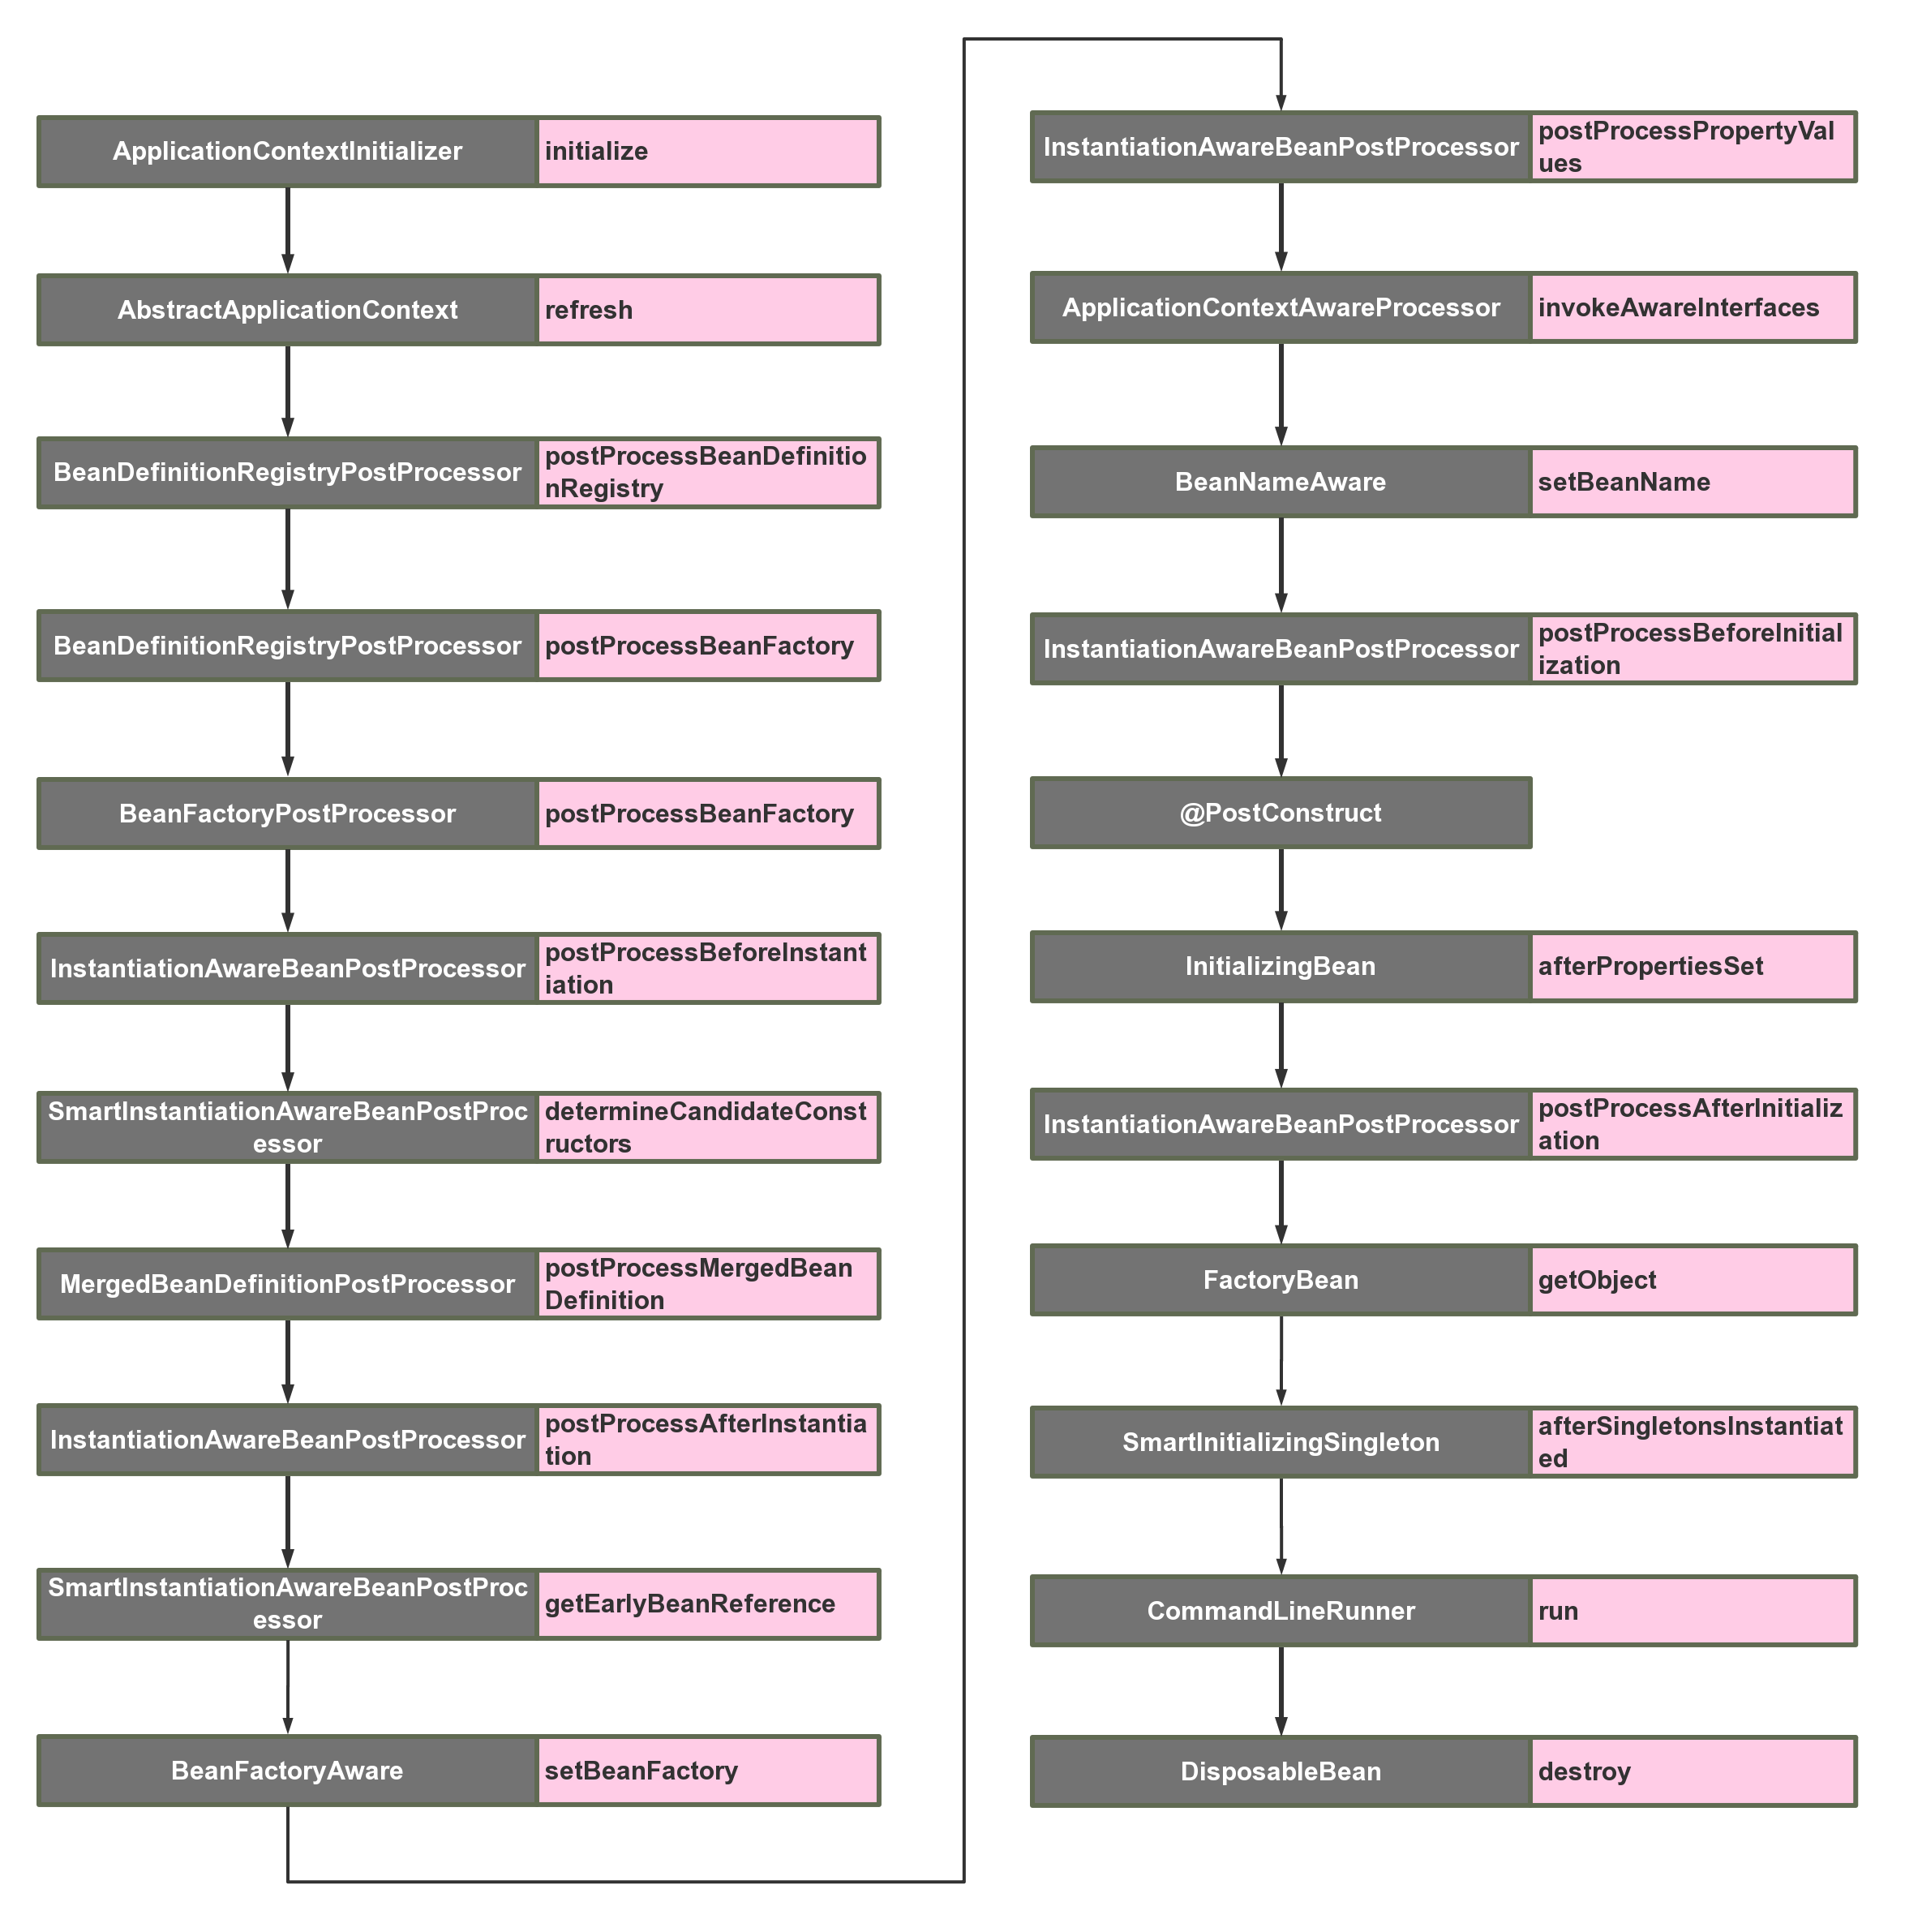
2.1 ApplicationContextInitializer
org.springframework.context.ApplicationContextInitializer
这是整个spring容器在刷新之前初始化ConfigurableApplicationContext的回调接口,简单来说,就是在容器刷新之前调用此类的initialize方法。这个点允许被用户自己扩展。用户可以在整个spring容器还没被初始化之前做一些事情。
可以想到的场景可能为,在最开始激活一些配置,或者利用这时候class还没被类加载器加载的时机,进行动态字节码注入等操作。
public class TestApplicationContextInitializer implements ApplicationContextInitializer {
    @Override
    public void initialize(ConfigurableApplicationContext applicationContext) {
        System.out.println("[ApplicationContextInitializer]");
    }
}
因为这时候spring容器还没被初始化,所以想要自己的扩展的生效,有以下三种方式:
- 在启动类中用
springApplication.addInitializers(new TestApplicationContextInitializer())语句加入 - 配置文件配置
context.initializer.classes=com.example.demo.TestApplicationContextInitializer - Spring SPI扩展,在
spring.factories中加入org.springframework.context.ApplicationContextInitializer=com.example.demo.TestApplicationContextInitializer
2.2 BeanDefinitionRegistryPostProcessor
org.springframework.beans.factory.support.BeanDefinitionRegistryPostProcessor
这个接口在读取项目中的beanDefinition之后执行,提供一个补充的扩展点
使用场景:你可以在这里动态注册自己的beanDefinition,可以加载classpath之外的bean
public class TestBeanDefinitionRegistryPostProcessor implements BeanDefinitionRegistryPostProcessor {
    @Override
    public void postProcessBeanDefinitionRegistry(BeanDefinitionRegistry registry) throws BeansException {
        System.out.println("[BeanDefinitionRegistryPostProcessor] postProcessBeanDefinitionRegistry");
    }

    @Override
    public void postProcessBeanFactory(ConfigurableListableBeanFactory beanFactory) throws BeansException {
        System.out.println("[BeanDefinitionRegistryPostProcessor] postProcessBeanFactory");
    }
}
2.3 BeanFactoryPostProcessor
org.springframework.beans.factory.config.BeanFactoryPostProcessor
这个接口是beanFactory的扩展接口,调用时机在spring在读取beanDefinition信息之后,实例化bean之前。
在这个时机,用户可以通过实现这个扩展接口来自行处理一些东西,比如修改已经注册的beanDefinition的元信息。
public class TestBeanFactoryPostProcessor implements BeanFactoryPostProcessor {
@Override
public void postProcessBeanFactory(ConfigurableListableBeanFactory beanFactory) throws BeansException {
    System.out.println("[BeanFactoryPostProcessor]");
}
}
2.4 InstantiationAwareBeanPostProcessor
org.springframework.beans.factory.config.InstantiationAwareBeanPostProcessor
该接口继承了BeanPostProcess接口,区别如下:
BeanPostProcess接口只在bean的初始化阶段进行扩展(注入spring上下文前后),而InstantiationAwareBeanPostProcessor接口在此基础上增加了3个方法,把可扩展的范围增加了实例化阶段和属性注入阶段。
该类主要的扩展点有以下5个方法,主要在bean生命周期的两大阶段:实例化阶段和初始化阶段,下面一起进行说明,按调用顺序为:
- postProcessBeforeInstantiation:实例化bean之前,相当于new这个bean之前
- postProcessAfterInstantiation:实例化bean之后,相当于new这个bean之后
- postProcessPropertyValues:bean已经实例化完成,在属性注入时阶段触发,@Autowired,@Resource等注解原理基于此方法实现
- postProcessBeforeInitialization:初始化bean之前,相当于把bean注入spring上下文之前
- postProcessAfterInitialization:初始化bean之后,相当于把bean注入spring上下文之后
使用场景:这个扩展点非常有用 ,无论是写中间件和业务中,都能利用这个特性。比如对实现了某一类接口的bean在各个生命期间进行收集,或者对某个类型的bean进行统一的设值等等。
public class TestInstantiationAwareBeanPostProcessor implements InstantiationAwareBeanPostProcessor {

@Override
public Object postProcessBeforeInitialization(Object bean, String beanName) throws BeansException {
    System.out.println("[TestInstantiationAwareBeanPostProcessor] before initialization " + beanName);
    return bean;
}

@Override
public Object postProcessAfterInitialization(Object bean, String beanName) throws BeansException {
    System.out.println("[TestInstantiationAwareBeanPostProcessor] after initialization " + beanName);
    return bean;
}

@Override
public Object postProcessBeforeInstantiation(Class<?> beanClass, String beanName) throws BeansException {
    System.out.println("[TestInstantiationAwareBeanPostProcessor] before instantiation " + beanName);
    return null;
}

@Override
public boolean postProcessAfterInstantiation(Object bean, String beanName) throws BeansException {
    System.out.println("[TestInstantiationAwareBeanPostProcessor] after instantiation " + beanName);
    return true;
}

@Override
public PropertyValues postProcessPropertyValues(PropertyValues pvs, PropertyDescriptor[] pds, Object bean, String beanName) throws BeansException {
    System.out.println("[TestInstantiationAwareBeanPostProcessor] postProcessPropertyValues " + beanName);
    return pvs;
}
2.5 SmartInstantiationAwareBeanPostProcessor
org.springframework.beans.factory.config.SmartInstantiationAwareBeanPostProcessor
该扩展接口有3个触发点方法:
predictBeanType:该触发点发生在postProcessBeforeInstantiation之前(在图上并没有标明,因为一般不太需要扩展这个点),这个方法用于预测Bean的类型,返回第一个预测成功的Class类型,如果不能预测返回null;当你调用BeanFactory.getType(name)时当通过bean的名字无法得到bean类型信息时就调用该回调方法来决定类型信息。determineCandidateConstructors:该触发点发生在postProcessBeforeInstantiation之后,用于确定该bean的构造函数之用,返回的是该bean的所有构造函数列表。用户可以扩展这个点,来自定义选择相应的构造器来实例化这个bean。getEarlyBeanReference:该触发点发生在postProcessAfterInstantiation之后,当有循环依赖的场景,当bean实例化好之后,为了防止有循环依赖,会提前暴露回调方法,用于bean实例化的后置处理。这个方法就是在提前暴露的回调方法中触发。
public class TestSmartInstantiationAwareBeanPostProcessor implements SmartInstantiationAwareBeanPostProcessor {

    @Override
    public Class<?> predictBeanType(Class<?> beanClass, String beanName) throws BeansException {
        System.out.println("[TestSmartInstantiationAwareBeanPostProcessor] predictBeanType " + beanName);
        return beanClass;
    }

    @Override
    public Constructor<?>[] determineCandidateConstructors(Class<?> beanClass, String beanName) throws BeansException {
        System.out.println("[TestSmartInstantiationAwareBeanPostProcessor] determineCandidateConstructors " + beanName);
        return null;
    }

    @Override
    public Object getEarlyBeanReference(Object bean, String beanName) throws BeansException {
        System.out.println("[TestSmartInstantiationAwareBeanPostProcessor] getEarlyBeanReference " + beanName);
        return bean;
    }
}
2.6 BeanFactoryAware
org.springframework.beans.factory.BeanFactoryAware
这个类只有一个触发点,发生在bean的实例化之后,注入属性之前,也就是Setter之前。这个类的扩展点方法为setBeanFactory,可以拿到BeanFactory这个属性。
使用场景为,你可以在bean实例化之后,但还未初始化之前,拿到 BeanFactory,在这个时候,可以对每个bean作特殊化的定制。也或者可以把BeanFactory拿到进行缓存,日后使用。
扩展方式为:
public class TestBeanFactoryAware implements BeanFactoryAware {
    @Override
    public void setBeanFactory(BeanFactory beanFactory) throws BeansException {
        System.out.println("[TestBeanFactoryAware] " + beanFactory.getBean(TestBeanFactoryAware.class).getClass().getSimpleName());
    }
}
2.7 ApplicationContextAwareProcessor
org.springframework.context.support.ApplicationContextAwareProcessor
该类本身并没有扩展点,但是该类内部却有6个扩展点可供实现 ,这些类触发的时机在bean实例化之后,初始化之前
该类用于执行各种驱动接口,在bean实例化之后,属性填充之后,通过执行扩展接口,来获取对应容器的变量。
EnvironmentAware:用于获取EnviromentAware的一个扩展类,这个变量非常有用, 可以获得系统内的所有参数。当然个人认为这个Aware没必要去扩展,因为spring内部都可以通过注入的方式来直接获得。EmbeddedValueResolverAware:用于获取StringValueResolver的一个扩展类, StringValueResolver用于获取基于String类型的properties的变量,一般我们都用@Value的方式去获取,如果实现了这个Aware接口,把StringValueResolver缓存起来,通过这个类去获取String类型的变量,效果是一样的。ResourceLoaderAware:用于获取ResourceLoader的一个扩展类,ResourceLoader可以用于获取classpath内所有的资源对象,可以扩展此类来拿到ResourceLoader对象。ApplicationEventPublisherAware:用于获取ApplicationEventPublisher的一个扩展类,ApplicationEventPublisher可以用来发布事件,结合ApplicationListener来共同使用,下文在介绍ApplicationListener时会详细提到。这个对象也可以通过spring注入的方式来获得。MessageSourceAware:用于获取MessageSource的一个扩展类,MessageSource主要用来做国际化。ApplicationContextAware:用来获取ApplicationContext的一个扩展类,ApplicationContext应该是很多人非常熟悉的一个类了,就是spring上下文管理器,可以手动的获取任何在spring上下文注册的bean,我们经常扩展这个接口来缓存spring上下文,包装成静态方法。同时ApplicationContext也实现了BeanFactory,MessageSource,ApplicationEventPublisher等接口,也可以用来做相关接口的事情。
2.8 BeanNameAware
org.springframework.beans.factory.BeanNameAware
可以看到,这个类也是Aware扩展的一种,触发点在bean的初始化之前,也就是postProcessBeforeInitialization之前,这个类的触发点方法只有一个:setBeanName
使用场景为:用户可以扩展这个点,在初始化bean之前拿到spring容器中注册的的beanName,来自行修改这个beanName的值。
扩展方式为:
public class NormalBeanA implements BeanNameAware{
    public NormalBeanA() {
        System.out.println("NormalBean constructor");
    }

    @Override
    public void setBeanName(String name) {
        System.out.println("[BeanNameAware] " + name);
    }
}
2.9 @PostConstruct
javax.annotation.PostConstruct
这个并不算一个扩展点,其实就是一个标注。其作用是在bean的初始化阶段,如果对一个方法标注了@PostConstruct,会先调用这个方法。这里重点是要关注下这个标准的触发点,这个触发点是在postProcessBeforeInitialization之后,InitializingBean.afterPropertiesSet之前。
使用场景:用户可以对某一方法进行标注,来进行初始化某一个属性
扩展方式为:
public class NormalBeanA {
    public NormalBeanA() {
        System.out.println("NormalBean constructor");
    }

    @PostConstruct
    public void init(){
        System.out.println("[PostConstruct] NormalBeanA");
    }
}
2.10 InitializingBean
org.springframework.beans.factory.InitializingBean
这个类,顾名思义,也是用来初始化bean的。InitializingBean接口为bean提供了初始化方法的方式,它只包括afterPropertiesSet方法,凡是继承该接口的类,在初始化bean的时候都会执行该方法。这个扩展点的触发时机在postProcessAfterInitialization之前。
使用场景:用户实现此接口,来进行系统启动的时候一些业务指标的初始化工作。
扩展方式为:
public class NormalBeanA implements InitializingBean{
    @Override
    public void afterPropertiesSet() throws Exception {
        System.out.println("[InitializingBean] NormalBeanA");
    }
}
2.11 FactoryBean
org.springframework.beans.factory.FactoryBean
一般情况下,Spring通过反射机制利用bean的class属性指定支线类去实例化bean,在某些情况下,实例化Bean过程比较复杂,如果按照传统的方式,则需要在bean中提供大量的配置信息。配置方式的灵活性是受限的,这时采用编码的方式可能会得到一个简单的方案。Spring为此提供了一个org.springframework.bean.factory.FactoryBean的工厂类接口,用户可以通过实现该接口定制实例化Bean的逻辑。
它们隐藏了实例化一些复杂bean的细节,给上层应用带来了便利。从Spring3.0开始,FactoryBean开始支持泛型,即接口声明改为FactoryBean<T>的形式
使用场景:用户可以扩展这个类,来为要实例化的bean作一个代理,比如为该对象的所有的方法作一个拦截,在调用前后输出一行log,模仿ProxyFactoryBean的功能。
public class TestFactoryBean implements FactoryBean<TestFactoryBean.TestFactoryInnerBean> {

    @Override
    public TestFactoryBean.TestFactoryInnerBean getObject() throws Exception {
        System.out.println("[FactoryBean] getObject");
        return new TestFactoryBean.TestFactoryInnerBean();
    }

    @Override
    public Class<?> getObjectType() {
        return TestFactoryBean.TestFactoryInnerBean.class;
    }

    @Override
    public boolean isSingleton() {
        return true;
    }

    public static class TestFactoryInnerBean{

    }
}
2.12 SmartInitializingSingleton
org.springframework.beans.factory.SmartInitializingSingleton
这个接口中只有一个方法afterSingletonsInstantiated,其作用是是 在spring容器管理的所有单例对象(非懒加载对象)初始化完成之后调用的回调接口。其触发时机为postProcessAfterInitialization之后。
使用场景:用户可以扩展此接口在对所有单例对象初始化完毕后,做一些后置的业务处理。
public class TestSmartInitializingSingleton implements SmartInitializingSingleton {
    @Override
    public void afterSingletonsInstantiated() {
        System.out.println("[TestSmartInitializingSingleton]");
    }
}
2.13 CommandLineRunner
org.springframework.boot.CommandLineRunner
这个接口也只有一个方法:run(String... args),触发时机为整个项目启动完毕后,自动执行。如果有多个CommandLineRunner,可以利用@Order来进行排序。
使用场景:用户扩展此接口,进行启动项目之后一些业务的预处理。
public class TestCommandLineRunner implements CommandLineRunner {

    @Override
    public void run(String... args) throws Exception {
        System.out.println("[TestCommandLineRunner]");
    }
}
2.14 DisposableBean
org.springframework.beans.factory.DisposableBean
这个扩展点也只有一个方法:destroy(),其触发时机为当此对象销毁时,会自动执行这个方法。比如说运行applicationContext.registerShutdownHook时,就会触发这个方法。
public class NormalBeanA implements DisposableBean {
    @Override
    public void destroy() throws Exception {
        System.out.println("[DisposableBean] NormalBeanA");
    }
}
2.15 ApplicationListener
org.springframework.context.ApplicationListener
准确的说,这个应该不算spring&springboot当中的一个扩展点,ApplicationListener可以监听某个事件的event,触发时机可以穿插在业务方法执行过程中,用户可以自定义某个业务事件。但是spring内部也有一些内置事件,这种事件,可以穿插在启动调用中。我们也可以利用这个特性,来自己做一些内置事件的监听器来达到和前面一些触发点大致相同的事情。
接下来罗列下spring主要的内置事件:
-
ContextRefreshedEvent
ApplicationContext 被初始化或刷新时,该事件被发布。这也可以在 ConfigurableApplicationContext接口中使用 refresh() 方法来发生。此处的初始化是指:所有的Bean被成功装载,后处理Bean被检测并激活,所有Singleton Bean 被预实例化,ApplicationContext容器已就绪可用。 -
ContextStartedEvent
当使用 ConfigurableApplicationContext (ApplicationContext子接口)接口中的 start() 方法启动 ApplicationContext 时,该事件被发布。你可以调查你的数据库,或者你可以在接受到这个事件后重启任何停止的应用程序。 -
ContextStoppedEvent
当使用 ConfigurableApplicationContext 接口中的 stop() 停止 ApplicationContext 时,发布这个事件。你可以在接受到这个事件后做必要的清理的工作 -
ContextClosedEvent
当使用 ConfigurableApplicationContext接口中的 close()方法关闭 ApplicationContext 时,该事件被发布。一个已关闭的上下文到达生命周期末端;它不能被刷新或重启 -
RequestHandledEvent
这是一个 web-specific 事件,告诉所有 bean HTTP 请求已经被服务。只能应用于使用DispatcherServlet的Web应用。在使用Spring作为前端的MVC控制器时,当Spring处理用户请求结束后,系统会自动触发该事件